|
|
|
1. INTRODUCTION |
|
All computer software works with data of some form. Literally the word data means - "that which is given". In computer terms data is the name given to the items operated upon by a computer program. Any data item used in a program has a number of attributes:
The nature of these attributes is defined by the type of the data item. Remember: data items can be class or instance fields, or can be "local" to a class or method. |
1.3. OperationsThe type of a data item also dictates the operations that can be performed on it. For example, it makes sense to allow the standard arithmetic operations to be applied to numeric data types; while the same cannot be said for (say) string data types. 1.4. Names (Identifiers)To do anything useful with a data item all the above must be tied together by giving the data item an identifying name (sometimes referred to as an identifier, label or symbol). In Java (like many other programming languages):
|
1.1. Address
1.2. Value
|
1.5 SummaryData Items comprise: (1) a name, (2) an address and (3) a value (Figure 1). It is important to distinguish between these. The type of a data item dictates:
Data items can be:
A data item is defined using a data declaration. Java like most modern programming languages, is what is known as a strictly typed language (and strictly classed). This means that Java insists that programmers be precise when defining (declaring) and using data items, this in turn ensures that errors resulting from incorrectly defining/using data items are avoided. |

Figure 1: Components of a data item (click on components!)
2. DATA DECLARATIONS, ASSIGNMENT AND INITIALISATION |
|
A data declaration introduces a data item. In Java this is achieved by associating the item's identifier with a data type: int integerItem; Here we have declared a data item integerItem which is of type int. A declaration statement can occur in either: (1) a class definition, (2) a formal parameter definition (the "signature" of a method) or (3) within a method declaration (the "body" of a method). Assignment is the process of associating a value with a data item. This is achieved using an assignment operator ('='). Java example: integerItem = 2; Here we have assigned a literal value 2 to the data item integerItem. Alternatively, on the right hand side of the assignment operator we could have used an identifier, an expression or the result of a method call. Examples: |
integerItem = myDataItem;
integerItem = (myDataItem+2) *
	someIncrement;
integerItem = myInstance.
	myMethod(argument1,
	argument2);
(Note that the last example assumes we are calling a public instance method from outside the class where it is defined; when calling a method from inside the class where it is defined we omit the instance identifier, e.g. integerItem = myMethod(argument1,argument2);.) Initialisation is then the process of assigning an initial value to a (field or local) data item on declaration. For example: int intergerItem = 2; Here we have declared a data item integerItem which is of type int and takes an initial value of 2. Note that in Java this cannot be done where data items are declared as formal parameters to methods (but more on this later). |
|
In Table 1 a short Java class definition is presented to illustrate the different forms of data initialisation available in Java. Here we have initialised (declared and assigned values to) a sequence of data fields using the variety of different manners supported by Java. Note that in keeping with the spirit of OOP all the data fields are declared to be private, i.e. they can only be accessed from within the class where they are declared. This contains two methods, one to output the instance fields and one to assign new values to the fields --- note how the formal parameters to the second method are declared. The content of the methods describes the algorithmic part of the program. Prior to implementation we should think carefully about the algorithm(s) we are going to use (algorithm = series of steps to achieve some end goal). |
Many design techniques exist to provide appropriate support for this endeavour. One simple technique that we will be using is the Nassi-Shneiderman chart. Using Nassi-Shneiderman each method is described by a box containing a number of smaller boxes each describing a particular "step" in the algorithm. The sequence in which these steps should be executed starts from the top and ends at the bottom of the outer box. This sequence is termed the flow of control. In the above example the sequence of steps is rather trivial, thus we could argue that there is no need for a design stage in this case, however we should get into the "habit" of designing methods before implementing. This makes good software engineering sense in that it will lead to a sound design and save on the effort required for implementation. The Nassi-Shneiderman charts for the above are given in Figure 2. (Note that, in the Figure, the arrows are not part of the Nassi-Shneiderman technique but have been included simply to indicate flow of control through the diagram). |
// DATA INITIALISATION CLASS
// Frans Coenen
// Monday 24 February 1999
// The University of Liverpool, UK

public class DataInitialisation {

    // --------------- FIELDS ------------------

    private int fieldDataItem1 = 0;
    private int fieldDataItem2 = 1, fieldDataItem3 = 2;
    private int fieldDataItem4 = fieldDataItem3;
    private int fieldDataItem5 = fieldDataItem2+fieldDataItem4;

    // --------------- METHODS ------------------

    /* ------ OUTPUT DATA ------ */
    /* Method to output values associated with instance fields. */

    public void outputData() {
	System.out.print(fieldDataItem1 + " ");
	System.out.print(fieldDataItem2 + " ");
	System.out.print(fieldDataItem3 + " ");
	System.out.print((fieldDataItem4 + 1) + " ");
	System.out.println(fieldDataItem5 + " ");
	}

    /* ------ NEW VALUES ------ */
    /* Method to assign new values to the instance fields. */

    public void newValues(int value1, int value2, int value3,
    		int value4, int value5) {
	fieldDataItem1 = value1;
	fieldDataItem2 = value2;
	fieldDataItem3 = value3;
	fieldDataItem4 = value4;
	fieldDataItem5 = value5;
        }
    }
|
Table 1: Data initialisation program
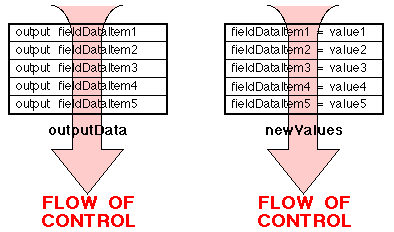
Figure 2: Nassi-Shneiderman charts for methods in DataInitialisation class (arrows included simply to enhance readability --- not part of NS technique)
The class presented in Table 1 does not include a main method so we cannot use it directly. We could have included a main method but, again in the spirit of object oriented programming, we should keep application classes and class definitions of the above form apart as this will encourage desirable OOP features such as reusability, flexibility, adaptability and extension. Thus we will write a second "application" class that will use the above class (note that they must both be in the same directory) as shown in Table 2.
// DATA INITIALISATION APPLICATION
// Frans Coenen
// Monday 24 February 1999
// The University of Liverpool, UK

public class DataInitialisationApp {

    // --------------- METHODS ------------------

    /* ------ MAIN METHOD ------ */

    public static void main(String[] args) {
    	int localDataItem1 = 1;
    	int localDataItem2 = 2, localDataItem3 = 3;
    	int localDataItem4 = localDataItem3;
    	int localDataItem5 = localDataItem2+localDataItem4;

    	// Create a DataInitialisation instance

    	DataInitialisation newDataInitInst = new DataInitialisation();

    	// Output the field data values assigned on initialisation

    	newDataInitInst.outputData();

    	// Change the field data values by assigning values of local data
	// items and output.

    	newDataInitInst.newValues(localDataItem1,localDataItem2,
			localDataItem3,localDataItem4,localDataItem5);
    	newDataInitInst.outputData();
    	}
    }
|
Table 2: Example application class
|
Here we have created an application class with a single method, main, which has a number of local data items associated with it (note how they have been declared). We also created an instance newDataInitInst which is an instance of the class DataInitialisation using the constructor DataInitialisation(). Note that this has not been explicitly defined anywhere, this is because Java automatically creates a default constructor for each class if no constructor of this form has been defined. In effect an instance created by the constructor can be thought of as a compound data item (a data item which, simultaneously, has more than one value associated with it) which is of type DataInitialisation. |
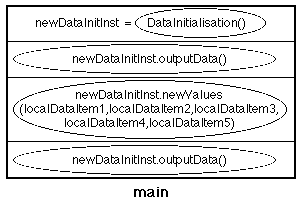
Figure 3: Nassi-Shneiderman charts for methods in DataInitialisationApp class |
|
Note also how we have linked the instance, using the dot operator, to the various methods in the DataInitialisation() class. The Nassi-Shneiderman chart for the above main method is given in Figure 3. Note how the method calls have been included in the chart. For completeness the class diagram associated with the above is given in Figure 4 (Remember that the filled arrow indicates an association between the classes and not inheritance). |
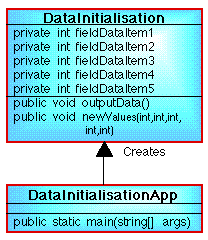
Figure 4: Class diagram for data initialisation code |
|
To compile the above java source code files we type: javac DataInitialisation.java javac DataInitialisationApp.java This will produce two JBC (Java Byte Code) files: DataInitialisation.class and DataInitialisationApp.class. To interpret the resulting byte code we invoke the JVM (Java Virtual Machine) interpreter as follows: java DataInitialisationApp The result will be: 0 1 2 3 4 1 2 3 4 5 |
Notes:
|
3. RANGE AND PRECISION |
|
Note: precision is not the same as requiring output to be to a certain number of decimal places. |
|
Two's complement is the most common number code for storing integer values. Considering the following 8 bit "value box":
Figure 5: Example 8 bit value box Using this box and given the binary number 10001101, this will be equivalent to -128+8+4+1 = -115. |
Thus any two's complement number with a leading 1 represents a negative number (and vice-versa). Therefore, in the above case, the largest negative number that can be stored is -128, and the largest positive number is 127. Thus using two's complement notation the absolute value for a negative number is always one more than the absolute value for a positive number (this can be confirmed by inspection of the Figure). To give two further examples the number 1 would be represented by the bit pattern 00000001, and the number -1 by the bit pattern 11111111 (assuming a 8-bit architecture). |
|
The bit pattern for a "real" numeric type is arranged as shown in Figure 6. Note that assigning more bits for the exponent will increase the range and decrease the precision (and vice versa). Broadly we can identify two approaches to real number storage: 
Figure 6: Real number storage |
Floating point storage offers the advantage that it can be used to represent both very large and very small numbers without having to store all the zeroes (although this may involve some rounding up/down). Most modern imperative languages, including Java, use floating point storage. |
Created and maintained by Frans Coenen. Last updated 10 February 2015
