2011/12
This lab follows on from the previous two labs, in exploring how data can be represented within table views. It introduces the notion of Modal Views, which can be used to interrupt the application to retrieve new data, such as adding entries to the table. It also extends the exploration of container classes, by demonstrating how they can be manipulated to dynamically modify entries in a table, and how these entries can drive a UINavigationController. An example of using a UITableView within a nib is given, in addition to sample code on subclassing UITableViewCell.
Lab 7 - KingsQueens Part C (11/12)
22/11/2011


Introduction
This tutorial continues from Lab 6 (Kings and Queens Part B) to explore how tables can be used within view controller nib files, and how modal views can be used to interrupt the application to communicate with the user for tasks such as data acquisition etc.
Todays Tasks:
Walkthrough - Step 1: Create a new version of the KingsQueens App using a View Controller and UITableView.
As in the previous labs, we start again from scratch to create our app, as a new version of the data source (in JSON) will be used. Begin by creating an Empty Application application called KingsQueens3 (note the change in name). Type in the name into the Product Name field and the Class Prefix, As before, ensure that the device Family is set to iPhone, and that you are not using Core Data, Automatic Reference Counting or Unit Testing.
Unlike previous labs, this application will exploit the use of a UITableView object within a nib file. In addition, we will create a subclass of a UITableViewCell, to illustrate how this can be used to create custom cells.
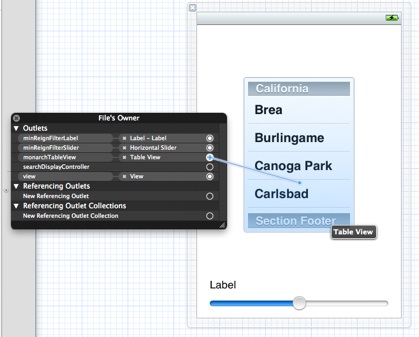
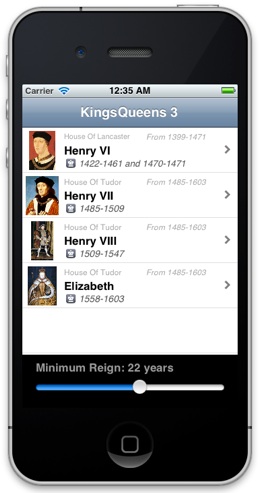
Start by creating a new UIViewController with a nib file (for iPhone), and give it the name MonarchsViewController. This view controller will be managed by a UINavigationController, and will be the first (or root) view controller. It’s view will consist of a UTIableView, a label and a slider; the tableview will be used to display the top-level monarchs, which when selected, will push a second view controller onto the navigation controller’s stack, whereas we will use the label and slider later to select a subset of monarchs to appear in the tableview.
The following code declares the three interface objects, and declares them as properties so that they can be linked to the nib file. Modify the MonarchsViewController.h file to include the iVars.
@interface MonarchsViewController : UIViewController <UITableViewDelegate, UITableViewDataSource> {
UITableView *monarchTableView;
UILabel *minReignFilterLabel;
UISlider *minReignFilterSlider;
}
@property (atomic, retain) IBOutlet UITableView *monarchTableView;
@property (atomic, retain) IBOutlet UILabel *minReignFilterLabel;
@property (atomic, retain) IBOutlet UISlider *minReignFilterSlider;
@end
Note that we also added two additional protocols to the interface definition - for the UITableViewDelegate and the UITableViewDataSource. This tells the compiler that the view controller adheres to these protocols, which support the use of the UITableView.
As we have already seen, the use of tables requires a number of methods that provide information about the data source for the table, as well as other methods that the table uses to support how it appears, and how it can be configured. These methods should be defined within the table view’s two delegates. When using a UITableViewController, several of these methods would be included as stub code within the UITableViewController implementation; this is because a UITableViewController acts as both the controller of a single table, and as its delegates. In our case - where we are manually attaching a UITableView within the nib belonging to a UIViewController - we need to define these methods, and identify the delegates explicitly.
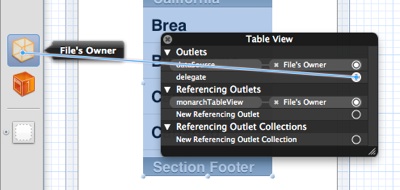
If you right click on the UITableView, you will notice that this object itself has two Outlets: a dataSource and delegate. These need to be connected to the File’s Owner, to identify that the View Controller itself acts as the delegate and datasource for the table view.
To finish the initial implementation of the MonarchsViewController, we will need to provide some initial methods required but the delegate protocols. In this case, we will define:
-
1)The number of sections in the table view
-
2)The number of rows in each section
-
3)The contents of each cell
-
4)The action that should be performed when a cell is selected.
As each of these methods has been covered in some detail in the previous two labs, we will insert some stub code for now. Add the following methods to your implementation file. Note that for now, we assume 5 rows, and simply create text in each cell to check it works. We’ll worry about using live data later:
// ==================================================================================
#pragma mark - Table view data source
- (NSInteger)numberOfSectionsInTableView:(UITableView *)tableView
{
// Return the number of sections.
return 1;
}
- (NSInteger)tableView:(UITableView *)tableView numberOfRowsInSection:(NSInteger)section
{
// Return the number of rows in the section.
return 5;
}
- (UITableViewCell *)tableView:(UITableView *)tableView cellForRowAtIndexPath:(NSIndexPath *)indexPath
{
static NSString *CellIdentifier = @"Cell";
UITableViewCell *cell = [tableView dequeueReusableCellWithIdentifier:CellIdentifier];
if (cell == nil) {
cell = [[[UITableViewCell alloc] initWithStyle:UITableViewCellStyleDefault reuseIdentifier:CellIdentifier] autorelease];
}
// Configure the cell...
[[cell textLabel] setText:[NSString stringWithFormat:@"Dummy Row %d", 1+[indexPath row]]];
return cell;
}
// ==================================================================================
#pragma mark - Table view delegate
- (void)tableView:(UITableView *)tableView didSelectRowAtIndexPath:(NSIndexPath *)indexPath
{
// Navigation logic may go here. Create and push another view controller.
/*
<#DetailViewController#> *detailViewController = [[<#DetailViewController#> alloc] initWithNibName:@"<#Nib name#>" bundle:nil];
// ...
// Pass the selected object to the new view controller.
[self.navigationController pushViewController:detailViewController animated:YES];
[detailViewController release];
*/
}
// ==================================================================================
We have two last tasks before we are ready to compile. If we simply wanted to display this view, then we would just need to instantiate this view controller in the app delegate and add its view as a subview to the window. However, we actually want this view to be managed by a UINavigationController. Go to the KingsQueens3AppDelegate.h header file, and create an ivar for a UINavigationController:
@interface KingsQueens3AppDelegate : UIResponder <UIApplicationDelegate> {
UINavigationController *myNavigationController;
}
In the KingsQueens3AppDelegate.m source file, insert the following code in the override point for customisation in the application:didFinishLaunchingWithOptions method. Note that you will also have to import the MonarchsViewController.h header file in this source file.
// Override point for customization after application launch.
// =======================================================================================
MonarchsViewController *myRootViewController = [[MonarchsViewController alloc] initWithNibName:@"MonarchsViewController" bundle:nil];
myNavigationController = [[UINavigationController alloc] initWithRootViewController:myRootViewController];
[myRootViewController release]; // This has been retained by the navigation controller
[[self window] addSubview:[myNavigationController view]];
// =======================================================================================
Look closely at the code (above) and try to understand what is happening. You have done something similar before, when creating a UITableViewController. Note, however, that in this case, we are using just a UIViewController, but also passing in a nib file. However, the mechanism is essentially the same.

Compile the code and run. You should notice the table in the middle of the screen, a Navigation Bar at the top of the screen, and the Label at the very bottom - however, lower than where we placed it in the nib. Likewise, the slider may have disappeared!!!
The UINavigationController will automatically create a Navigation Bar for us - this is where each view’s title goes, and where the back button will appear (if more than one view controller is on the navigator’s stack). The view owned by the topmost view will then appear below this. However, this has caused us a problem, as the actual view size is no longer the same as the one we modified in the Interface Builder Tool.
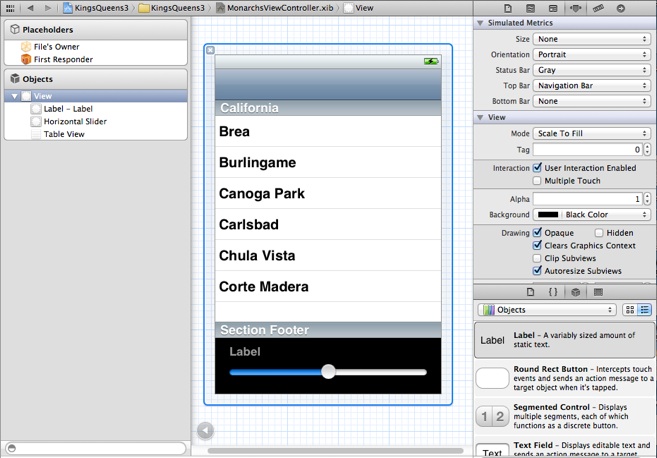
Fortunately, the Interface Builder tool can resize views to account for the fact that they might appear with a Navigation Bar (or Tab bar, if a UITabBarController is used). Return to the MonarchsViewController.xib nib file, and start by repositioning the label and the slider away from the bottom. Select the main view, and then look at the Attribute’s Inspector. The first set of options will be listed under the title “Simulated Metrics”. These simulate changes to the devices window without adding elements to the view of nib file. Change the “Top Bar” setting to “Navigation Bar”, to simulate the effect of viewing the view within a UINavigationController - you will see the Navigation bar appear, and the rest of the interface elements move down the view.
Note that this is not the same as adding a navigation bar to the view - nothing is added to the nib file!!!

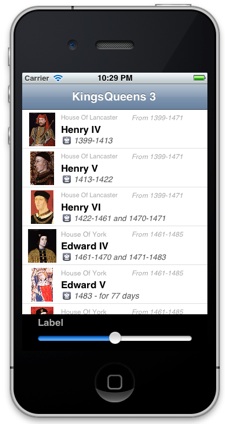
Reposition the slider and label, and this time move the table view to the top of the view (under the navigation bar, and make it as wide as the screen. The image below illustrates the resulting nib, with the view’s background set to black, and the label’s colour set to “Light Text Colour”:
Compile and run again - the interface should now look better.
Walkthrough - Step 2: Read data and insert into a UITableViewCell Subclass.
In this step, we will read in new JSON data, and use this to populate a UITableViewCell subclass, to illustrate the third way of customising cells. We will then modify the loaded data to cache the loaded images, and create a detailed view which will be pushed onto the navigation stack whenever a cell is selected.
We’ll start by loading the new data. The source of the new data is:
http://www.csc.liv.ac.uk/people/trp/Teaching_Resources/COMP327/Monarchs4.json
The data in this file is similar to earlier JSON files, except that the monarchs are now organised back into houses (where each house holds an array of monarchs), and each monarch has an additional key-value pair approximating the number of years that monarch ruled England. Start by downloading the JSON parser as a zip file. Expand the zip file (if it is not expanded automatically) and drag the JSON directory to your “Other Sources” directory within XCode. Make sure that the “Copy items into destination group’s folder (if needed)” box is ticked, as you want to include the items in your project. Then include the following lines in the MonarchsViewController.m src file:
#import "DataSourceMacros.h"
#import "SBJson.h"
Download the following file: DataSourceMacros.h, and attach it to your project. It is simply a header file (not associated with any class file), which lists a number of string constants which will be useful for the remainder of the code, and will be included into all of the source files that use the data model resulting from this JSON data.
Also, download the following four files, that make up a subclass of a UITableViewCell
_files/crown.png)
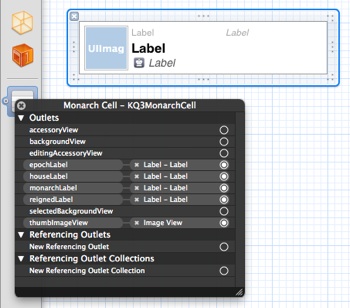
The nib file describes a custom cell that we will use in our table view. We could have used any form of cell customisation (either adding views, or using custom nibs). However, in this lab we will look at how cell subclasses can be used. One advantage of using this approach is that cells can now be configured simply by calling property-based getters and setter methods, as these properties are linked to the cell’s nib file. This eliminates the need for using tags for identifying different interface elements. In addition, it is easier to add other controls, such as segmented controls or switches, or include animation within the cell. Take a look at these three files, and see how they are defined. Note that there is one important difference in the way the nib file is used in this example! The outlets for the custom cell appear within the View icon (on the left of the Interface Builder screen), rather in the File’s owner, as is the case with view controllers.
To load the data, add the following ivar to MonarchsViewController.h
NSMutableArray *kQDataModel;
Then add the following method to MonarchsViewController.m, and ensure that you are importing the macro header file DataSourceMacros.h
- (void) loadKQ3DataModel {
kQDataModel = nil;
// Generate the URL request for the JSON data
NSURL *url = [NSURL URLWithString:KQURL];
// Get the contents of the URL as a string
NSString *jsonString = [NSString stringWithContentsOfURL:url
encoding:NSUTF8StringEncoding error:nil];
if (jsonString) {
// Create a mutable version of the JSON data, and include all elements
kQDataModel = [self filterKQ3DataModel:[jsonString JSONValue] withMinDuration:0];
[kQDataModel retain];
}
}
You should notice the yellow warning triangle appear near the line containing the method filterKQ3DataModel:withMinDuration. That is ok, as we will add this shortly. Add the following lines to the method initWithNibName:bundle: to set the title of the view, and to load the data:
// Custom initialization
[self setTitle:@"KingsQueens 3"];
[self loadKQ3DataModel];
The next step is to update the table view’s data source methods. Replace the following three methods, as follows: the first simply checks the number of houses in our model by counting the top level array.
- (NSInteger)numberOfSectionsInTableView:(UITableView *)tableView
{
// Return the number of sections.
return [kQDataModel count];
}
The second method returns the number of monarchs in each house. Use the section value to identify the relevant house, and then extract from that the number of monarchs for that house:
- (NSInteger)tableView:(UITableView *)tableView numberOfRowsInSection:(NSInteger)section
{
// Return the number of rows in the section.
NSDictionary *house = [kQDataModel objectAtIndex:section];
NSArray *monarchs = [house objectForKey:MONARCHS_KEY];
return [monarchs count];
}
The final method creates a custom cell, and fills in the values of that cell. Once we have a cell, it is a simple matter of then filling in the values of the cell. If a cell needs to be created, then we will call the method getKQ3CellFromNib (defined further below) which obtains a cell from the nib file. Take a look at the case where we display the thumb image. In the implementation (below), we see if there is an image stored in the dictionary. When the data is first parsed, no such images will exist, and thus we need to load them. However, once loaded, it is more efficient to save (cache) them, than load them each time. This is especially important on slow net connections. When you run the application, you might notice that the scrolling can be jerky - especially if you run the application on a slow network connection. Hence, this is the first attempt to improve performance. We will look at better ways of doing this later in the lab.
Make sure that you also include the header file for KQ3MonarchCell.h in your MonarchsViewController.m file.
- (UITableViewCell *)tableView:(UITableView *)tableView cellForRowAtIndexPath:(NSIndexPath *)indexPath
{
static NSString *CellIdentifier = @"KQ3MonarchCell";
KQ3MonarchCell *cell = [tableView dequeueReusableCellWithIdentifier:CellIdentifier];
if (cell == nil) {
cell = [self getKQ3CellFromNib];
}
// Configure the cell...
NSDictionary *house = [kQDataModel objectAtIndex:[indexPath section]];
NSArray *monarchs = [house objectForKey:MONARCHS_KEY];
NSMutableDictionary *kingQueen = [monarchs objectAtIndex:[indexPath row]];
NSLog(@"%@", kingQueen);
[[cell monarchLabel] setText:[kingQueen objectForKey:NAME_KEY]];
[[cell houseLabel] setText:[house objectForKey:HOUSETITLE_KEY]];
[[cell epochLabel] setText:[house objectForKey:HOUSEEPOCH_KEY]];
[[cell reignedLabel] setText:[kingQueen objectForKey:REIGNED_KEY]];
// Do we have a cached image
UIImage *thumbImage = [kingQueen objectForKey:CACHETHUMB_KEY];
if (thumbImage == nil) {
NSURL *url = [NSURL URLWithString:[kingQueen objectForKey:THUMB_KEY]];
thumbImage = [UIImage imageWithData:[NSData dataWithContentsOfURL:url]];
[kingQueen setObject:thumbImage forKey:CACHETHUMB_KEY];
}
[[cell thumbImageView] setImage:thumbImage];
[cell setAccessoryType:UITableViewCellAccessoryDisclosureIndicator];
return cell;
}
The code to extract the custom cell from the nib is relatively simple; however, as we also need to do something similar to resize the table’s row heights, it is more convenient to put the code into a method. Add the following method to MonarchsViewController.m
// Get the Cell Nib, and look through the objects to find one that
// is a UITableViewCell - only the first one found is returned.
// Note that the nib contents are not attached to any File's Owner!
// Thus this cell subclass could be loaded by any View Controller
- (KQ3MonarchCell *)getKQ3CellFromNib {
KQ3MonarchCell *cell = nil;
NSArray *topLevelObjects = [[NSBundle mainBundle]
loadNibNamed:@"KQ3MonarchCell"
owner:self options:nil];
for (id currentObject in topLevelObjects) {
if ([currentObject isKindOfClass:[UITableViewCell class]]) {
cell = (KQ3MonarchCell *) currentObject;
break;
}
}
return cell;
}
As Nib files can contain multiple objects, this method extracts all of the objects in an array, and then iterates through these objects until the first object that is a kind of UITableViewClass (or one of its subclasses) is found - this is then returned.
Now we can obtain a custom cell, we can use this to resize the default table row height. Add the following lines to the viewDidLoad method:
// Do any additional setup after loading the view from its nib.
// Get a cell and work out the height
KQ3MonarchCell *cell = [self getKQ3CellFromNib];
if (cell != nil) {
CGRect cellRect = [cell bounds];
[monarchTableView setRowHeight:cellRect.size.height];
}
The very last step we need is to add the following method, which we discuss in the following step. For now, add it to your project, compile and test.
- (NSMutableArray *) filterKQ3DataModel:(NSArray *)dataModel withMinDuration:(int)minDuration
{
// This method creates a new mutable structure containing elements from dataModel, where
// the value for the key-value pair DURATION_KEY is equal to, or greater than minDuration.
int duration = 0;
// =======================================================
// Declare all of the new mutable structures
NSMutableArray *newDataModel = nil; // The top level array, replacing data model
NSMutableArray *newMonarchArray = nil; // The array of monarchs in each house
NSMutableDictionary *newHouseDict = nil; // The dictionary for each house
// =======================================================
// Declare variables to iterate through the old structures
NSDictionary *houseDict; // The dictionary for each house
NSArray *monarchArray; // The array of monarchs in each house
NSDictionary *singleMonarchDict; // The dictionary for a single monarch
for (houseDict in dataModel) {
monarchArray = [houseDict objectForKey:MONARCHS_KEY];
newMonarchArray = nil;
NSLog(@"monarchArray: %@", monarchArray);
for (singleMonarchDict in monarchArray) {
duration = [[singleMonarchDict valueForKey:DURATION_KEY] intValue];
if (duration >= minDuration) {
// We want this element
NSLog(@"Including %@ who reigned for %d years", [singleMonarchDict valueForKey:NAME_KEY], duration);
if (newMonarchArray==nil) {
newMonarchArray = [NSMutableArray array];
}
[newMonarchArray addObject:[NSMutableDictionary dictionaryWithDictionary:singleMonarchDict]];
}
}
// At this point we have checked each of the monarchs in the house. If the monarchArray is not empty,
// then we need to create the house dictionary. Otherwise, there are no monarchs selected for this house,
// in which case we can ignore the house entry in the top level array
if (newMonarchArray != nil) {
NSString *houseTitleStr = [houseDict objectForKey:HOUSETITLE_KEY];
NSString *epochStr = [houseDict objectForKey:HOUSEEPOCH_KEY];
newHouseDict = [NSMutableDictionary dictionaryWithObjectsAndKeys:newMonarchArray, MONARCHS_KEY,
houseTitleStr, HOUSETITLE_KEY, epochStr, HOUSEEPOCH_KEY, nil];
// Add this to the new top level array
if (newDataModel == nil) {
newDataModel = [NSMutableArray array];
}
[newDataModel addObject:newHouseDict];
}
}
return newDataModel;
}
Walkthrough - Step 3: Filter the data structure to only include monarchs who have reigned for a given duration
In the previous step, we introduced the method filterKQ3DataModel:withMinDuration: which we use to filter the monarch entries in the data structure. In this step, we will utilise this to select what entries should be displayed, and examine in more detail how the method works. The slider and label that were inserted into the nib file will be used to determine what monarchs will be displayed, based on the duration that each monarch was on the throne (i.e. using the value of the “duration” key-value pair.
Start by adding the code to determine the value of the slider and to update the corresponding label. This involves initialising the slider, storing the current value of the slider, and creating a method that displays this setting in the label. Create an ivar in the header file MonarchsViewController.h of type int, called reignFilterVal, and initialise its value to 0 within the method initWithNibName:bundle: (see the code fragment below).
...
if (self) {
// Custom initialization
[self setTitle:@"KingsQueens 3"];
[self loadKQ3DataModel];
reignFilterVal = 0;
}
...
Create the method setReignFilterLabel: in MonarchsViewController.m to display a value val in the label minReignFilterLabel. The method itself is simple, and we could have chosen to put this text inline within other methods to update the label. However, by creating a method, we have a simpler way of updating the label from anywhere in our code, and it makes the code easier to maintain. Don’t forget to include the method prototype in the header file.
- (void)setReignFilterLabel:(int)val {
[minReignFilterLabel setText:[NSString stringWithFormat:@"Minimum Reign: %d years", val]];
}
Next, update the method viewDidLoad to initialise the slider bounds (i.e. the upper and lower value), and the initial value (note that we cast the value from an into to a float and call setReignFilterLabel: to display the value of reignFilterVal.
// Initialise the slider
[self setReignFilterLabel:reignFilterVal];
[minReignFilterSlider setMinimumValue:0.0];
[minReignFilterSlider setMaximumValue:40.0];
[minReignFilterSlider setValue:(float)reignFilterVal animated:NO];
Finally, in order to update the label when the value of the slider changes, we need an IBAction method which, in response to the event Value Changed, obtains the current value of the slider, calls the method setReignFilterLabel: (above). The method sliderValueChanged: (below) retrieves the current slider value, and then stores this into an integer (remember that the UISlider property value returns a float), which is then checked against the iVar reignFilterVal. If these two values differ, the label is updated and the new value is saved in the iVar reignFilterVal. Add this method, and then then attach it to the slider, so that the event Value Changed calls this method. Compile this, and check that it works.
- (IBAction)sliderValueChanged:(id)sender {
int newVal = [minReignFilterSlider value];
if (newVal != reignFilterVal) {
[self setReignFilterLabel:(reignFilterVal = newVal)];
}
}
All that remains is to create a canonical version of the original data model array, and use this to create copies which would then be used to drive the UITableView. Modify the method loadKQ3DataModel so that instead of simply storing the JSON data in the iVar kQDataModel, store this in a new NSMutableArray called kQDataSource (ensuring this is declared as an ivar in the header file), and then based on this, store a copy of the mutable array (called kQDataModel) using the method filterKQ3DataModel:withMinDuration, which could be changed later.
- (void) loadKQ3DataModel {
kQDataModel = nil;
kQDataSource = nil;
// Generate the URL request for the JSON data
NSURL *url = [NSURL URLWithString:KQURL];
// Get the contents of the URL as a string
NSString *jsonString = [NSString stringWithContentsOfURL:url
encoding:NSUTF8StringEncoding error:nil];
if (jsonString) {
// Create a mutable version of the JSON data, and include all elements
kQDataSource = [self filterKQ3DataModel:[jsonString JSONValue] withMinDuration:0];
[kQDataSource retain];
kQDataModel = [self filterKQ3DataModel:kQDataSource withMinDuration:0];
[kQDataModel retain];
}
}
The method filterKQ3DataModel:withMinDuration: generates a filtered, mutable copy of the original data model array based on the value of each monarchs duration on the throne (and a minimum duration). The resulting array also caches any images loaded within the method tableView:cellForRowAtIndexPath: (called whenever a cell is revealed in the UITableView). One possibility would be to call this method whenever the slider value changes. However, the current approach has inherent delays due to the loading of images in the main thread (we revisit this in Step 6 in this lab), and due to the fact that any cached images are lost every time the method filterKQ3DataModel:withMinDuration: is called. An alternative would be only to copy and filter the original data model array only once the slider value has finished changing (i.e. after a Touch Up Inside event). Create the method sliderValueSelected: which is triggered when this event is called (insert the method prototype for this method in the MonarchsViewController.h header file, and link it to the nib file), and add the following code to the start of the method:
- (IBAction)sliderValueSelected:(id)sender {
// Update the label and store the latest slider value (if necessary)
[self sliderValueChanged:sender];
...
}
This starts by calling the method sliderValueChanged: (defined above), to ensure that the value of the slider when it is no longer being changed is the one that determines the label and the filtered array. We now need to release the old data model array, and create a new copy based on the new value of the minimum reign duration and our original data model array.
...
// Release the old data model, and create a new copy
[kQDataModel release];
kQDataModel = [self filterKQ3DataModel:kQDataSource withMinDuration:reignFilterVal];
[kQDataModel retain];
...
Once this is done all that remains is to tell the UITableView to reload the data, resulting in the creation of cells for only those monarchs in the filtered array.
...
// Update the table
[monarchTableView reloadData];
}
It is worth reviewing the approach taken here, and looking more closely at the method filterKQ3DataModel:withMinDuration:. The approach taken here relies on the notion of filtering a copy of the data structure, prior to using it as a source for the UITableView. This simplifies things, as once the copy has been made, it can be used not only to determine the number of sections in the table (remember that the table is actually split into several sections - one for each house displayed), but also the number of rows in each section (corresponding to the number of monarchs in that house). In addition, it means that any indexPath used (such as calls to the method tableView:didSelectRowAtIndexPath:) simply translate to identifying a monarch entry by first determining the relevant section (i.e. the house) and then the relevant row (i.e. the monarch in that house).
Of course, during the filtering, if no monarchs in a given house are to be included in the array, then the corresponding house should also be omitted in the final data structure. Look back at the json data file, and then take a closer look at the main loops in the method filterKQ3DataModel:withMinDuration:. Note that the json data is structured as an array of dictionaries, each of which corresponds to a house. In each house dictionary, there are three key-value pairs (the house title, its overall duration or epoch, and an array of monarchs). Each monarch element in the array is itself a dictionary.
[
{"monarchs": [
{
"name":"Henry IV",
"born":"3 Apr 1366",
...
},{
"name":"Henry VI",
"born":"6 Dec 1421",
...
}
],
"title":"House Of Lancaster",
"epoch":"From 1399-1471"
},
{"monarchs": [
{
"name":"Edward IV",
"born":"28 Apr 1442",
...
etc
Therefore we start by iterating over each of the elements (houseDict) in the array of dictionaries (dataModel), each of which corresponds to a house. The array of monarchs is then identified (monarchArray). The aim is to build a new array (newMonarchArray). However, we simply set the value of this object to nil, as we only want to create it if there are monarchs to to include in it!
for (houseDict in dataModel) {
monarchArray = [houseDict objectForKey:MONARCHS_KEY];
newMonarchArray = nil;
NSLog(@"monarchArray: %@", monarchArray);
At this point, we now want to examine each of the elements in the monarch array, to see if it meets our filter criteria. We iterate over each of the array elements (singleMonarchDict) which are themselves dictionaries, and check the monarchs reign duration. If this is greater (or equal to) minDuration than we want to add it to our new data structure. We check to see if we have an array for the current house, and if not (i.e. it is nil), we create it. A new mutable dictionary is then created and initialised by copying the values found in the original dictionary, using the class factory dictionaryWithDictionary: and then added to the new array (newMonarchArray) using the method addObject:.
for (singleMonarchDict in monarchArray) {
duration = [[singleMonarchDict valueForKey:DURATION_KEY] intValue];
if (duration >= minDuration) {
// We want this element
NSLog(@"Including %@ who reigned for %d years", [singleMonarchDict valueForKey:NAME_KEY], duration);
if (newMonarchArray==nil) {
newMonarchArray = [NSMutableArray array];
}
[newMonarchArray addObject:[NSMutableDictionary dictionaryWithDictionary:singleMonarchDict]];
}
}
Finally, if at least one monarch was filtered, resulting in the created of a monarch array (newMonarchArray), then the enclosing dictionary for that house needs to be created to hold not only the monarch array, but also its overall duration or epoch, and the house title.
// At this point we have checked each of the monarchs in the house. If the monarchArray is not empty,
// then we need to create the house dictionary. Otherwise, there are no monarchs selected for this house,
// in which case we can ignore the house entry in the top level array
if (newMonarchArray != nil) {
NSString *houseTitleStr = [houseDict objectForKey:HOUSETITLE_KEY];
NSString *epochStr = [houseDict objectForKey:HOUSEEPOCH_KEY];
newHouseDict = [NSMutableDictionary dictionaryWithObjectsAndKeys:newMonarchArray, MONARCHS_KEY,
houseTitleStr, HOUSETITLE_KEY, epochStr, HOUSEEPOCH_KEY, nil];
// Add this to the new top level array
if (newDataModel == nil) {
newDataModel = [NSMutableArray array];
}
[newDataModel addObject:newHouseDict];
}
}
Walkthrough - Step 4: Add a detail view, and full image view to test out UINavigation
To display information in this view, we will exploit two dictionaries; the first corresponding to the monarch themselves, and a second which will be temporarily created to pass through details of the house (without providing all the house monarchs as well).
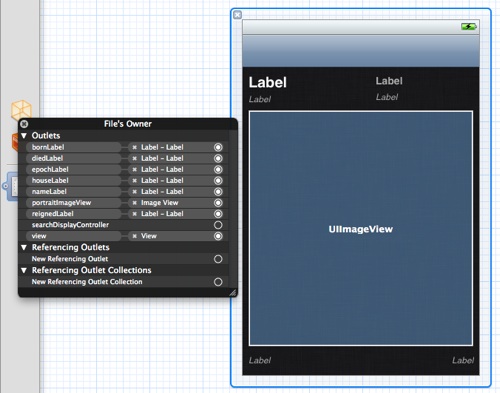
Start by creating a new UIViewController with a nib, called MonarchDetailViewController, and add a number of UILabels for: birth, death, epoch, house, name, reigned; and add a single UIImageView called portraitImageView (see illustration opposite)e. Remember to simulate the use of a navigation bar (don’t physically add one!) to support layout, and modify any of the presentation parameters as you like (i.e. font colour, position etc).
Update the MonarchDetailViewController.h header file to define UILabels and the UIImageView as properties. Also add two NSDictionary ivars (also as properties) to store the data from the previous view. The header file should look something like this:
@interface MonarchDetailViewController : UIViewController {
UILabel *nameLabel;
UILabel *houseLabel;
UILabel *epochLabel;
UILabel *bornLabel;
UILabel *reignedLabel;
UILabel *diedLabel;
UIImageView *portraitImageView;
NSDictionary *monarchDetails;
NSDictionary *houseDetails;
}
@property (nonatomic, retain) IBOutlet UILabel *nameLabel;
@property (nonatomic, retain) IBOutlet UILabel *houseLabel;
@property (nonatomic, retain) IBOutlet UILabel *epochLabel;
@property (nonatomic, retain) IBOutlet UILabel *bornLabel;
@property (nonatomic, retain) IBOutlet UILabel *reignedLabel;
@property (nonatomic, retain) IBOutlet UILabel *diedLabel;
@property (nonatomic, retain) IBOutlet UIImageView *portraitImageView;
@property (nonatomic, retain) NSDictionary *monarchDetails;
@property (nonatomic, retain) NSDictionary *houseDetails;
Ensure that all of the properties that appear in the Interface Builder’s File’s Owner are lined to the objects in the nib file. Synthesise the properties in the MonarchDetailViewController.m source file, and import the DataSourceMacros.h header file (to make use of the key macro strings).
We now have to generate the values of each object, given the data in the two dictionaries. For now, assume that monarchDetails contains only a number of strings pertaining to a single monarch, and that houseDetails has only two vey-value pairs corresponding to the house title and house epoch. We will set these values by modifying the viewDidLoad method. Add the following four code fragments:
// Here we simply insert the strings from the monarchDetails dictionary
[nameLabel setText:[monarchDetails objectForKey:NAME_KEY]];
[reignedLabel setText:[monarchDetails objectForKey:REIGNED_KEY]];
...
The above fragment simply updates the labels with strings from the monarchDetails dictionary.
...
// Here we do some additional formatting on the strings
[bornLabel setText:[NSString stringWithFormat:@"Born: %@", [monarchDetails objectForKey:BORN_KEY]]];
[diedLabel setText:[NSString stringWithFormat:@"Died: %@", [monarchDetails objectForKey:DIED_KEY]]];
...
In this case, we want to precede the strings with either “Born:” or “Died:”. To do this, we create two temporary strings (these will be autorelease because they are generated using the class factory method stringWithFormat:), which include the additional strings from the monarchDetails dictionary.
...
// Here we insert the strings from the houseDetails dictionary
[houseLabel setText:[houseDetails objectForKey:HOUSETITLE_KEY]];
[epochLabel setText:[houseDetails objectForKey:HOUSEEPOCH_KEY]];
...
The above fragment simply updates the labels with strings from the houseDetails dictionary.
...
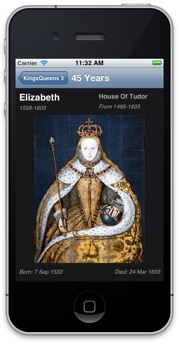
// Here we obtain the image from the internet (on the main thread!!!)
NSURL *url = [NSURL URLWithString:[monarchDetails objectForKey:IMAGE_KEY]];
UIImage *portraitImage = [UIImage imageWithData:[NSData dataWithContentsOfURL:url]];
[portraitImageView setImage:portraitImage];
...
Here, we extract the main image URL from the monarchDetails dictionary, and use this to retrieve an image as NSData, before converting it into a UIImage. The image is then inserted into the portraitImageView image view
...
// Finally we set the view's title - again formatting a string.
[self setTitle:[NSString stringWithFormat:@"%d Years", [[monarchDetails objectForKey:DURATION_KEY] intValue]]];
The final fragment sets the title of the view. in this case, we want to display a formatted string representing the approximate number of years the monarch ruled. To do this, we create a temporary NSString using the stringWithFormat: class factory, and insert an integer, corresponding to the duration. However, this duration was originally represented as a string in the monarchDetails dictionary, so NSString’s intValue method to turn the string into an int.
Note: whilst this may seam redundant, we did something similar in filterKQ3DataModel:withMinDuration: when filtering the monarchs. converting to an int, and then back to a string ensures that what appears in the title is the same value as that used in the filtering stage.
The final stage involves the creation of an instance of this view controller (in response to the selection of a cell in the main view) providing it with the two dictionaries, and then pushing the view onto the Navigation Stack. In Step 1, you added the delegate method tableView:didSelectRowAtIndexPath: to your MonarchsViewController.m source file. We now need to modify this method to create and push the view in response to the user selecting a cell.
Take a look at the tableView:didSelectRowAtIndexPath: method - you will notice a code fragment that is currently commented out. If you uncomment it, you will see the following:
// Navigation logic may go here. Create and push another view controller.
<#DetailViewController#> *detailViewController = [[<#DetailViewController#> alloc] initWithNibName:@"<#Nib name#>" bundle:nil];
// ...
// Pass the selected object to the new view controller.
[self.navigationController pushViewController:detailViewController animated:YES];
[detailViewController release];
The first line (starting with <#DetailViewController#> *detailViewController) needs to be replaced with the construction of our own MonarchDetailViewController. This line simply creates an instance of the view controller, and initialises it with a nib file. If we wanted to use a UITableViewController, then we would do something similar, but replace the initWithNibName:bundle: method with initWithStyle:. The next line:
[self.navigationController pushViewController:detailViewController animated:YES];
takes the newly created view controller and pushes this onto the navigation stack. As this will result in the UINavigationController retaining the view controller, we can then release it ourselves. Replace the first line by creating an instance of the MonarchDetailViewController view controller as follows (remember to import it’s header file as well):
MonarchDetailViewController *detailViewController = [[MonarchDetailViewController alloc]
initWithNibName:@"MonarchDetailViewController" bundle:nil];
After creating the view controller , but before pushing it onto the navigation stack, we want to call the setter property methods for setMonarchDetails: and setHouseDetails: to pass in the relevant data for the selected cell. Finding the relevant monarch details consists of navigating into the relevant house dictionary (based on the section of the selected cell), and then selecting the monarch (based on the row of the selected cell).
NSDictionary *house = [kQDataModel objectAtIndex:[indexPath section]];
NSArray *monarchs = [house objectForKey:MONARCHS_KEY];
NSMutableDictionary *kingQueen = [monarchs objectAtIndex:[indexPath row]];
[detailViewController setMonarchDetails:kingQueen];
In the case of the house details, it would be better to only pass the relevant details in a small dictionary, rather than passing in all of the details. This is typically good practice, but can be especially important when passing around mutable data structures, as it avoids accidental modification of data. The following code fragment creates a new non-mutable dictionary, which contains two key-value pairs, for the house title and the house epoch. This is then passed to the view controller, which will retain it. We can then release it, as we no longer need the dictionary ourselves.
// Create a temporary dictionary to pass through the two house elements to the view controller
// This avoids having to pass through potentially several objects.
NSDictionary *tmpHouseDetails = [NSDictionary dictionaryWithObjectsAndKeys:
[house objectForKey:HOUSETITLE_KEY], HOUSETITLE_KEY,
[house objectForKey:HOUSEEPOCH_KEY], HOUSEEPOCH_KEY, nil];
[detailViewController setHouseDetails:tmpHouseDetails];
[tmpHouseDetails release];
[monarchTableView deselectRowAtIndexPath:indexPath animated:NO];
Walkthrough - Step 5: Introduce concurrency for managing image loads etc
Coming shortly...
Note - Lab construction is still in progress
In addition to covering a number of issues, this lab is designed to provide numerous hints and guides to completing Assignment 2. The following material should appear within the next couple of days, so check back and try to complete the lab as well as the assignment.