2011/12
The following two labs will explore the use of Location-Aware computing and data persistence using plists and Core Data. In Lab 8, you will explore how to use Core Location, to get geospatial information about the user, and make use of the MapKit to display maps and generate annotations in a map. In addition, mechanisms for getting data from a user, by using a modal view controller to present a window developed for data entry, and introducing the need for delegates when using Text Fields. A UITabBarController is also used to present two different view controllers, that manage similar data.
In Lab 9, you will explore data persistence using plists and Core Data. Any data presented or acquired will be stored persistently (i.e. will be retained, even when the application quits and then restarts) using Core Data.
Lab 9 - NearestMe Part B (11/12)
08/12/2011


Introduction
The NearestMe Laps (Lab 8 and Lab 9) explore the use of data persistence, and the notion of location-aware computing. It utilises the skills developed from previous labs; in particular it relies on a working knowledge of the creation and manipulation of table views. In Lab 8, you will focus on developing an initial app that exploits two views within a UITabBarController, and then explore how to use Core Location to determine the current position, and view this graphically using MapKit. You will also be walked through the process of creating a modal view designed to get data from the user, and using textviews. Lab 9 will then explore how the resulting data can be stored using pLists and Core Data, as well as presenting one way to handle proximity with respect to geo-tagged data and the user’s current position. Both Labs work together - Lab 9 starts where Lab 8 ends, and thus they should be done together.
Todays Tasks:
Walkthrough - Step 1: Creating Managed Objects and saving them to a Core Data persistent store.
This carries on immediately after where the previous lab (Lab 8) ended, and assumes that you will continue with the same project. In the previous lab, you developed an application that could list entries in a table within one Tab view, or display a map relative to the current location in a second view. You also developed a modal view designed to obtain information from a user about a given location. This step explores how Core data can be used to store and retrieve data points from a persistent store.
Before starting, it is worth taking a looking at what you get within a Code Data based project. When you created the project, additional code appeared in the app delegate, and an empty core data model (NearestMe.xcdatamodeld) was created, known as the managed object model. In addition, the Core Data framework was linked to the project. If you take a look at the delegate’s header file, you will notice three additional properties, which you can use within your project:
-
*NSManagedObjectContext *managedObjectContext;
-
This references a single workspace which is responsible for coordinating managed objects, corresponding to a coherent model, and providing a consistent view of one or more persistent stores. Managed Objects can be retrieved into the context, manipulated, and then changes can be committed back to the store. The Managed Object Context also supports life-cycle management, validation, relationship maintenance, and undo/redo. Typically, this is the primary object that you will be using.
-
-
*NSManagedObjectModel *managedObjectModel;
-
This object references an internal representation of the schema model of the database stored within the persistent store, and thus manages the structure and relationships of the managed objects. The model is a collection of entity descriptions (corresponding, for example, to the entities created in the Model Editor within Xcode), also corresponding to tables within a database.
-
*NSPersistentStoreCoordinator *persistentStoreCoordinator;
-
Whilst not typically used often, this object manages a collection of persistent object stores, responsible for storing the data. Typically, there is only one store in iOS applications.
More information on these objects can be found in the Apple Developer Library.
In the original definition of our two main view controllers, we have added the properties managedObjectContext, and used these to obtain the managed object context from the App delegate. Before using this, however, we will need to create a data model.
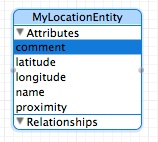
In Step 4 of Lab 8, we created a modal view to obtain data from the user. This will be the data that we will want to include in our model. In addition, we will want one additional data element - proximity - as this will be used to track the distance between the current position, and the location of the stored location entities. We therefore want to create a single entity within our model that contains the following data (and its type, in italics):
-
•double latitude
-
•double longitude
-
•double proximity
-
•string name
-
•string comment

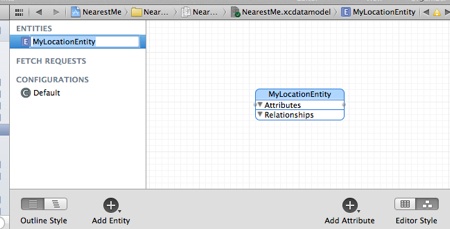
Select NearestMe.xcdatamodeld from the file list - this will start up the model editor. The Editor supports two styles: a list style (whereby Entities are listed in the left hand pane, and their attributes, relationships etc will be listed in the central pane); and a graphical style, whereby entities can be laid out graphically, with links representing the relationships, etc. Start by opening the “right-hand” style corresponding to the graphical editor.
There is an important difference between the name of the entity and the name of the Objective-C class used to represent the entity. When requesting objects of this type from Core Data, you will use the entity name to refer to the data objects that are managed by this entity description, and thus the class name doesn’t necessarily have to be the same. In fact, the generated classes are all subclasses of NSManagedObject, and there may be cases where you simply want to refer to objects using this class and not the subclass. Using custom managed object classes is a convenience.


Update the types of each of the attributes so that they correspond to the list of data and their types (above).
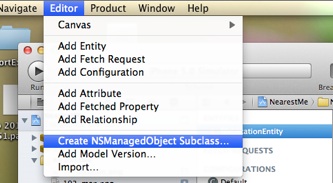
Look at your source files - you will notice two new files called MyLocationEntity.h and MyLocationEntity.m, which correspond to the new entity. Typically you will not need to modify these, but if you want to add any additional code to perform data changes, validation etc, then this is possible. Also notice that the properties of this class correspond to the attributes in our entity, with similar datatypes (the doubles have been converted to NSNumbers). In addition, the properties are not @synthesize’d but rather they use @dynamic. This because they are created and managed at run-time by the Core Data model, rather then generated at compile time (as is the case with @synthesize). Likewise, no dealloc method is generated, as Core Data manages memory for these properties.
It is worth noting that you can update your model at any time and recreate the class files - however, this will change the underlying model in your Core Data store. When testing, remember to reset the iOS Simulator (or remove the app from your device) before testing the app with a new data model, as the app will abort with the message: “reason = "The model used to open the store is incompatible with the one used to create the store" if an existing, but incompatible data model is found in the persistent data store.
We are now ready to create and retrieve instances of the custom managed object class MyLocationEntity. Start, by importing the header file “MyLocationEntity.h” in the MyLocListTableViewController.m implementation file. We will now modify the newLocationEntryComplete:wasCancelled:
method. Recall that in our application, when the user presses the “+” button in the Navigation Bar, the NewLocationEntryViewController view controller is created and presented modally. The newLocationEntryComplete:wasCancelled: method is then invoked when the user is done (or choses to cancel). We now need to retrieve the data from that view, and unless the user has cancelled the addition of data, we need to 1) create an object of type MyLocationEntity in Core Data; and 2) add this object to an array that can be used to manage the data for the table view.
In Lab 8, in Step 4, we created the done: and cancel: methods in the modal child view controller NewLocationEntryViewController, which are used to inform the parent class that the view is to close, by calling the newLocationEntryComplete:wasCancelled: method on the parent view controller. The next step is to implement this. However, before we do this, if the Done button was pressed, we will want to pass back the strings that were stored in the two text fields. Modify the method done: in NewLocationEntryViewController.m to include the two statements (below) prior to calling the delegate. Add the two ivars nameStr and commentStr as NSString objects, define them as properties, and synthesise them.
- (IBAction)done:(id)sender {
// Get values from the view before returning
[self setNameStr:[nameTextField text]];
[self setCommentStr:[commentTextField text]];
[[self delegate] newLocationEntryComplete:self wasCancelled:NO];
}
Modify the newLocationEntryComplete:wasCancelled: method to check to see if (cancelled == NO) and if so, we want to do something with the data in the NewLocationEntryViewController view controller prior to dismissing it. Use the accessor methods to access the values for location, nameStr and commentStr from the NewLocationEntryViewController view controller, and assign then to variables in our current method. In addition, create a new variable called proximity (of type NSNumber), and store within it a double with the value 0.0. You should have something like:
CLLocation *location = [controller location];
NSString *nameStr = [controller nameStr];
NSString *commentStr = [controller commentStr];
NSNumber *proximity = [NSNumber numberWithDouble:0.0];
At this point you might want to check to see if the strings are empty; if so, add some default value, to avoid the risk of listing empty strings in the table, or empty annotations on the map.
We now need to create a new managed entity, which we can then use. Add the following line:
// ==========================================================
// Create and configure a new instance of the Location entity
MyLocationEntity *newLocationEntity = (MyLocationEntity *)[NSEntityDescription
insertNewObjectForEntityForName:@"MyLocationEntity"
inManagedObjectContext:managedObjectContext];
There are several things to note here. We are creating a new instance of an NSEntityDescription, by inserting a managed object corresponding to the model object entity named “MyLocationEntity” into the managedObjectContext. This is then also returning the resulting object, which we then assign to the variable newLocationEntity. We can now use this new object just like any other object - calling setter accessor methods to set its property values, or getter accessor methods to retrieve its property values. In addition, this object can be stored in other container objects, such as NSDictionary or NSArray objects.
Set the values of the new managed object using the values retrieved from the NewLocationEntryViewController view controller. Note that the new entity stores latitude and longitude as double values (within NSNumbers), whereas your location is of type CLLocation. As such, you will have to extract the latitude and longitude values from this object.
Once we have updated the managed object, we want to save it within the persistent store. This is done not by saving that specific entity, but by saving the managed object context in which it resides. In fact this process results in objects in the current managed context being compared with the corresponding ones in the persistent store. If any have been changed, then these changes are committed to the store. If objects have been explicitly deleted from the context, then they will be deleted form the store. And correspondingly, if new objects have been inserted into the context, they will be added to the store. To save the context, we call the method save on the context. As this method can return an error using an error object, that also needs to be created:
// ==========================================================
// Save the new event
NSError *error = nil;
if (![managedObjectContext save:&error]) {
// We should handle the error
NSLog(@"Error in saving an event in addLocation");
}
The new object will now be in the store. However, we are not actually doing anything with these objects within the list. For now, we will set up an array to hold the elements and display them in the list. The next step will look at adding this object to the table view.
Walkthrough - Step 2: Adding the newly created Managed Object to the table, and obtain the current location.
For now, we will create that array, and use it to update the table. Add a new ivar in MyLocListTableViewController.h of type NSMutableArray called myLocationEntityArray; this is the array we will be using to store the list. For testing purposes, create (i.e. alloc and init) the mutable array in the viewDidLoad method. We can now add the managed object to the array.
The last thing we did with Core Data was to create a new entity within the managed object context, and save the context. After saving the context in the newLocationEntryComplete:wasCancelled: method, we now want to add the new object to the beginning of the myLocationEntityArray array:
// ==========================================================
// Update our location array and the table view
[myLocationEntityArray insertObject:newLocationEntity atIndex:0];
We could choose to insert the element at the beginning or end of the list (or in some arbitrary place), but for this tutorial, the aim is to insert it at the beginning, and then scroll the table to show the new entry at the top of the table. In the above code fragment, we inserted the element into the array; the next step is to insert this into the tableview, and scroll the tableview. We do this by creating an indexPath corresponding to the very first element in the table, and then insert a new row at that point with the contents of the new Location Entity managed object. Finally, as the table might have been scrolled, and not be showing the first element, we scroll back to that first element in the table.
NSIndexPath *indexPath = [NSIndexPath indexPathForRow:0 inSection:0];
[[self tableView] insertRowsAtIndexPaths:[NSArray arrayWithObject:indexPath]
withRowAnimation:UITableViewRowAnimationFade];
[[self tableView] scrollToRowAtIndexPath:indexPath atScrollPosition:UITableViewScrollPositionTop animated:YES];
Before we can test, we will need to update that data source delegate methods in our table view controller.
-
1)Modify numberOfSectionsInTableView: to return 1, as we will only store one section in this table
-
2)Modify tableView:numberOfRowsInSection: to return the number of elements in the array myLocationEntityArray.
-
3)Change the cell style in tableView:cellForRowAtIndexPath: to UITableViewCellStyleSubtitle.
-
4)Add the following lines to tableView:cellForRowAtIndexPath: to configure the cell:
MyLocationEntity *myloc = (MyLocationEntity *)[myLocationEntityArray objectAtIndex:[indexPath row]];
[[cell textLabel] setText:[myloc name]];
NSString *locStr = [NSString stringWithFormat:@"%.3f, %.3f",
[[myloc latitude] doubleValue],
[[myloc longitude] doubleValue]];
[[cell detailTextLabel] setText:locStr];
Compile and test. You will notice, however, that every time we go to add our current location, we end up simply saving the location of some place in Cupertino, in California. This is because we hard-coded location coordinates within the method xxx, prior to presenting the modal view. To overcome this, we want to create another location manager, and to query this whenever, we hit the “+” button. In addition, as we can use the locationManager to determine whether or not there are problems with obtaining the current location, we can both enable and disable the button appropriately. Complete the following steps:
-
1)Add the locationManager iVar to the MyLocListTableViewController.h header file, and ensure that the MyLocListTableViewController class adheres to the CLLocationManagerDelegate protocol.
-
2)Add the ivar addButton to the header file (this should be of type UIBarButtonItem). You don’t need to set this as an IBOutlet, as we create it programmatically.
-
3)In viewDidLoad, we no longer need to declare the type of the addButton object, as it is now declared in the header file. remove the declaration, to just leave the assignment, but then add the following line to disable the button. We will enable it only when location events are detected:
[addButton setEnabled:NO];
-
4)Copy the method locationManager from the NearestLocationViewController class into the MyLocListTableViewController class.
-
5)Add the following two delegate methods. Notice how they differ from their counterparts in NearestLocationViewController - in that method, we were displaying the location of newLocation and updating the map. In the code below, we don’t care about the location; but simply use the fact that locations are available to decide whether or not to enable the addButton.
// ================================================================================================
#pragma mark - Core Location Delegate Methods
- (void) locationManager:(CLLocationManager *)manager
didUpdateToLocation:(CLLocation *)newLocation
fromLocation:(CLLocation *)oldLocation {
[addButton setEnabled:YES];
}
- (void) locationManager:(CLLocationManager *)manager didFailWithError:(NSError *)error {
[addButton setEnabled:NO];
}
-
6)In NearestLocationViewController.m we used the two methods viewWillAppear: and viewWillDisappear: to either start or stop the generation of location events depending on whether the view controller’s view is visible or not. Update MyLocListTableViewController.m to do something similar
-
7)Finally, modify addLocation so that it gets the current location using the code fragment below, and passes this to xx instead of creating the artificial location testLoc (in fact, remove this object from the code). Add the code fragment as the first thing in that method, as we do not want to create a new data point if we cannot get the current location.
// ==========================================================
// Get current location
CLLocation *location = [locationManager location];
if (location == nil) {
return;
}
Compile the code and test. Initially, the add button should appear disabled, but shortly after, it will appear enabled. At this point, whenever you select this button, the current position should appear in the modal view, and can then be saved.
Walkthrough - Step 3: Retrieving the Managed Objects from a Core Data persistent store.
In the next step, we will look at how the objects from a persistent store can be loaded given a fetch request, and then we will use this to drive the table view. We will create a new method in MyLocListTableViewController.m called getDataFromCoreData, which is responsible for getting the data from the store in ascending order of proximity. We start by creating a fetch request, which will request all elements whose entity description name is "MyLocationEntity" (note that the entityt description name can differ from the name of the object into which the data is loaded) into the current object context.
// ================================================================================================
#pragma mark - Core Data Methods
- (void) getDataFromCoreData {
NSLog (@"Fetching data from Core in List View");
// A bespoke method to retrieve the data, and store it in myLocationEntityArray
// ====================================================================
// Get data from Core Data - 1) Define the Fetch Request
NSFetchRequest *request = [[NSFetchRequest alloc] init];
NSEntityDescription *entity = [NSEntityDescription entityForName:@"MyLocationEntity"
inManagedObjectContext:managedObjectContext];
[request setEntity:entity];
We then need to set a sort descriptor - this determines the order in which the data will be retrieved. As several sort descriptors could be used to order the data (for example, if several elements share the same value for the field used as the first sort descriptor, they can be subsequently sorted using a second sort descriptor), we need to put our sort descriptor into an array with this as the only value. If we don’t specify any sort descriptors, then the order in which objects are retuned is undefined.
// ====================================================================
// Get data from Core Data - 2) Set the Sort Descriptor
NSSortDescriptor *sortDescriptor = [[NSSortDescriptor alloc] initWithKey:@"proximity" ascending:YES];
NSArray *sortDescriptors = [[NSArray alloc] initWithObjects:sortDescriptor, nil];
[request setSortDescriptors:sortDescriptors];
[sortDescriptors release];
[sortDescriptor release];
We now need to execute the request. As we are storing the results of the fetch request into a mutable array (due to the fact that we will add, and possibly delete entries) we need to make a mutable copy of the retuned results.
// ====================================================================
// Get data from Core Data - 3) Execute the Request
NSError *error = nil;
NSMutableArray *mutableFetchResults = [[managedObjectContext executeFetchRequest:request error:&error] mutableCopy];
if (mutableFetchResults == nil) {
// Need to handle the error
NSLog(@"Error when fetching data from Core Data");
}
Finally, we assign the mutable array to our myLocationEntityArray array, and retain it. We assume that myLocationEntityArray is a retain property - this is because we might set it several times during the lifetime of the application. The retain property code will always release the old value (if necessary), when setting a new retain value. Update the header file to declare this as a property and remember to synthesise it.
// ====================================================================
// Cleaning up...
[self setMyLocationEntityArray:mutableFetchResults];
[mutableFetchResults release];
[request release];
}
All that remains is to call this method to populate the table. We could include this in viewDidLoad; however, as locations are listed in order of proximity, we might want to force a reload of the data every time the view controller’s view is loaded. Therefore call this method from within viewWillAppear:, andforce the table to update the data:
- (void)viewWillAppear:(BOOL)animated
{
[super viewWillAppear:animated];
[[self locationManager] startUpdatingLocation];
[self getDataFromCoreData];
[[self tableView] reloadData];
}
There is still one problem with our data - we never update the proximity field. Create the following method, which iterates through all the objects in myLocationEntityArray and updates their location field. Once done, the context is then saved, committing the field changes to the objects in the persistent store:
- (void) updateProximityWithNewLocation:(CLLocation *)newLocation {
// Assumes that data has already been loaded into myLocationEntityArray
if (myLocationEntityArray == nil) {
return;
}
// Iterate through, to update proximity and find nearest object.
MyLocationEntity *myloc;
CLLocationDistance proximity;
for (myloc in myLocationEntityArray) {
CLLocation *loc = [[[CLLocation alloc] initWithLatitude:[[myloc latitude] doubleValue]
longitude:[[myloc longitude] doubleValue]] autorelease];
proximity = [loc distanceFromLocation:newLocation];
[myloc setProximity:[NSNumber numberWithDouble:proximity]];
}
NSError *error = nil;
[managedObjectContext save:&error];
}
This should be called every time the location changes, which occurs whenever locationManager:didUpdateToLocation:fromLocation: is called. Call updateProximityWithNewLocation: from within this method to update the values of the array. Note that although we do not actually sort the array, a sorted array can be obtained by simply retrieving the data from Core Data. Update the array this way, and refresh the table.
Compile and test.
Whilst there are a couple more steps to undertake to complete the lab, all of the material necessary to complete the final assignment has now been covered...!
Note - Lab construction is still in progress
Additional Tasks.
Task 1: Look at the documentation for GeoCoding Location Data. Augment your NewLocationEntryViewController class definition to create a placemark for the current location and display this on the view.