2013/14
This tutorial gives you the opportunity to find out about building your own app using the Model View Controller design pattern. It follows the approach of using nib files and properties to automatically generate accessor methods. In addition, it gives you the opportunity to experience using the Manual Retain Release (MRR) model of memory management (as opposed to ARC - introduced in iOS5). In this tutorial, you will need to consider the separation of the model, the a custom view, and the need for handling events in the controller.
Lab 2- Understanding MVC with SketchMe (13/14)
01/10/2013

The aim of this tutorial is to introduce yourself to the notion of building simple applications, exploiting the Model-View-Controller design pattern to organise your code design. You will be introduced to the notion of building an interface and loading these as Nib files within your application. You will look at how to link interface objects to outlets and actions, and how data models can be managed by view controllers and used to drive views. Part of the tutorial assumes knowledge of declaring and synthesising “properties”, which provide a shorthand to declaring accessor methods for classes. You will also be introduced to the notion of touch events, and will explore how these can be used to track the user’s touch within some coordinate system used by a view.
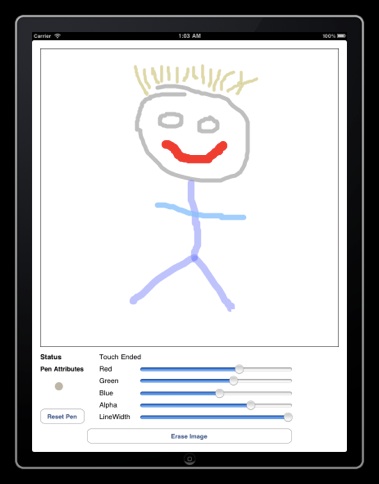
The aim is to construct an application which forms the basis for a drawing app. The characteristics of the app are as follows:
-
1.The UIViewController class should be subclassed and designed to manage the the main screen view
-
2.A new View subclass should be designed to correspond to the drawing region, and support the “painting” of the user’s drawing (stored in a data model)
-
3.A UILabel should provide information to the user; providing coordinate details when the user moves their finger within the drawing region.
-
4.Touch Event methods should detect when a touch event occurs within the View class area.
-
5.Motion methods should detect when the device is shaken.
-
6.Slider, and other interface elements should allow the user to change the characteristics of the drawn lines.
Note that the lab is split into two sections (Lab 2’s tasks and Lab 3’s tasks). These are guides to help you plan your work - if you fail to complete one of the lab’s tasks in a given week, it is probably a good idea to find time to catch up before the following week. If you haven’t completed the previous week’s work, then try to finish this, as each lab builds upon previous lab material.
If you get all the work done, then great - take a look to see if the following week's labs are available.
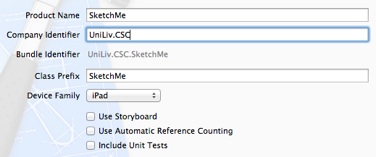
The tutorial is primarily aimed at developing an iPad app; however, there is no reason why you shouldn’t select the iPhone option, if you want to test this out using your own iPhone/iPod touch. Keep in mind that you will need to scale down any dimensions to fit your screen.
Create a new file of type “Objective-C class” (look under iOS Cocoa Touch when selecting the file type), and when asked, make it a subclass of UIView. Give it the name “MySketchView”. This will create two new files, MySketchView.h and MySketchView.m, which you will modify to define how the drawing area is used.
In the next step, you will define how the view is “painted” when it appears on the screen, and you will add a new view to the nib file and set it to be an instance of this new subclass. In the file MySketchView.m, you will notice the method drawRect: is commented out. Uncomment this method, and add the following line of code [self resetRectView]; to that method. The method should look like this:
// Only override drawRect: if you perform custom drawing.
// An empty implementation adversely affects performance during animation.
- (void)drawRect:(CGRect)rect
{
// Drawing code
[self resetRectView];
}
You now need to add the definition of resetRectView which generates a GRect object corresponding to the boundary or edges of the view, and strokes this rectangle with a black outline. Don’t forget to declare the resetRectView method in the view class’s header file.
- (void)resetRectView{
CGRect bounds = [self bounds];
[[UIColor blackColor] set];
UIRectFrame(bounds);
}
We now need to add an outlet for an instance of this class in the SketchMeViewController class. We can then add a UIView object to the nib file, and modify this to be an instance of MySketchView, before linking it to the outlet. Modify the view controller header file (SketchMeViewController.h) to import the MySketchView header file and declare the ivar “sketchView” as an outlet, so that the interface definition looks like this:
#import <UIKit/UIKit.h>
#import "MySketchView.h"
@interface SketchMeViewController : UIViewController {
MySketchView *sketchView;
}
@property (nonatomic, retain) IBOutlet MySketchView *sketchView;
@end
Don’t forget to also synthesise the properties in the implementation file.


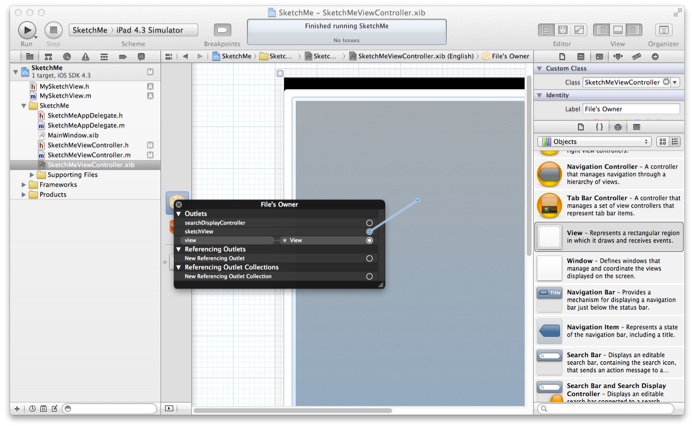
Compile the Code. You should now see the iPad simulator appear with a square box outlined in black. If you changed the colour of the view to gray, the box will be filled with a gray colour. Note - if you don’t see the black line around the box, then you have not correctly linked the view to the property. Check the custom class setting for the square view; this should be MySketchView. Also check that you have both the view and sketchView outlets linked to the two different view objects.
Walkthrough - Step 2.
In this step, we will add two further objects to the interface, one of which will be linked to an outlet. Add an instance of a label onto the nib under the sketchView object. Change the test label so that it reads Status; change the font to Helvetica Bold (hint, this can be set in the Attributes Inspector), look at the and resize the label so that it is 120 pixels wide. Add a second label to the right of this, and change its width to be 550 pixels wide. Make sure that the two labels don't overlap. Add a new iVar of type UILabel called statusLabel to your sketchMeViewController header file, and make this a property. We will use this to check the status of touch events, and other debugging information. The header file should now look more like this:
@interface SketchMeViewController : UIViewController {
UILabel *statusLabel;
MySketchView *sketchView;
}
@property (nonatomic, retain) IBOutlet UILabel *statusLabel;
@property (nonatomic, retain) IBOutlet MySketchView *sketchView;
In the sketchMeViewController implementation file, synthesise the new property, and modify the method viewDidLoad to define an initial string for new UILabel outlet.
// Implement viewDidLoad to do additional setup after loading the view, typically from a nib.
- (void)viewDidLoad
{
NSString *statusMsg = [NSString stringWithString:@"Application Initialised"];
[statusLabel setText:statusMsg];
[super viewDidLoad];
}
Finally, link the statusLabel outlet to the second (wider) label on the nib. Compile the code and verify that the application works.
Open the SketchMeViewController header file and add a UILabel outlet called statusLabel. We will use this to check the status of touch events, and other debugging information. Remember to declare the properties in the header file and synthesise in the implementation file.
Walkthrough - Step 3.
The next step is to add touch events and record where the touch event occurs. The following sample code can be used to detect the presence of a ”touchesBegan” or “touchesMove” event, and generate a message within the statusLabel IBOutlet. It also generates messages for when a “touchesEnded” or “touchesCancelled” event occurs. Look carefully at the code, and the comments in the code to understand what is going on.
// ========================================
#pragma mark - Touch Events
// ========================================
- (void)touchesBegan:(NSSet *)touches withEvent:(UIEvent *)event {
// We only support single touches, so anyObject retrieves just that touch from touches
UITouch *touch = [touches anyObject];
MySketchView *myView = [self sketchView];
if ([touch view] == myView) {
// touches occured in this view only
CGPoint touchPoint = [touch locationInView:myView];
// As we are using a class factory here, we don't have to worry about
// managing the memory - it has already been autoreleased!
NSString *statusMsg = [NSString stringWithFormat:@"Touch Began at %.0f, %.0f",
touchPoint.x, touchPoint.y];
[statusLabel setText:statusMsg];
}
}
- (void)touchesMoved:(NSSet *)touches withEvent:(UIEvent *)event {
// We only support single touches, so anyObject retrieves just that touch from touches
UITouch *touch = [touches anyObject];
MySketchView *myView = [self sketchView];
if ([touch view] == myView) {
// Several things worth noting here. [touch view] returns the view in which
// the touch *began*, and *not* the view the touch is currently in! So
// we still check this, in case the touch started outside the view!
// We also don't check whether or not the touch goes outside the bounds
// of the view. This check is trivial - in the view class we get the view
// bounds to paint this boundry. We can do something similar here on that
// view to check whether the touch has left the view.
CGPoint touchPoint = [touch locationInView:myView];
NSString *statusMsg = [NSString stringWithFormat:@"Touch Move at %.0f, %.0f",
touchPoint.x, touchPoint.y];
[statusLabel setText:statusMsg];
}
}
// touchesEnded and touchesCancelled are handled here to ensue consistency
// in managing touch events. Even if we don't care about them, we should
// implement empty methods to prevent the event propagating up the responder
// chain.
- (void)touchesEnded:(NSSet *)touches withEvent:(UIEvent *)event {
NSString *statusMsg = [NSString stringWithString:@"Touch Ended"];
[statusLabel setText:statusMsg];
}
- (void)touchesCancelled:(NSSet *)touches withEvent:(UIEvent *)event {
NSString *statusMsg = [NSString stringWithString:@"Touch Cancelled"];
[statusLabel setText:statusMsg];
}
Note that in the method touchesBegan:withEvent: we made use of class factories to generate the string which was then sent to (and thus retained by) the status label, i.e.:
NSString *statusMsg = [NSString stringWithFormat:@"Touch Began at %.0f, %.0f",
touchPoint.x, touchPoint.y];
[statusLabel setText:statusMsg];
This could have also been implemented by calling alloc on an NSString, and then releasing it when done - i.e.
NSString *statusMsg = [[NSString alloc] initWithFormat:@"Touch Began at %.0f, %.0f",
touchPoint.x, touchPoint.y];
[statusLabel setText:statusMsg];
[statusMsg release];
The advantage of using the class factory is that we do not have to worry about cleaning up the string once it has been passed to the label, as class factory objects are managed by the autorelease pool. This allows us to embed class factories in other statements - for example the above could could have been shortened to this:
[statusLabel setText: [NSString stringWithFormat:@"Touch Began at %.0f, %.0f",
touchPoint.x, touchPoint.y]];
Add the touch events within the SketchMeViewContoller.m implementation file to handle the case when the user touches or moves their finger on the MySketchView view. For completeness, add the corresponding function prototypes in the header file. Feel free to modify the code for the different events, but ensure the above functionality is achieved.
Compile the code, to ensure that it works correctly. Try touching insider the drawing area, and then dragging outside - note that touch events are still generated outside the bounds of the sketchView. If you touch outside the view and drag inside it, note that the coordinates will not be updated - this is explained in the code comments. Finally, note that if you drag outside of the whole screen, a touch Ended event will be generated!
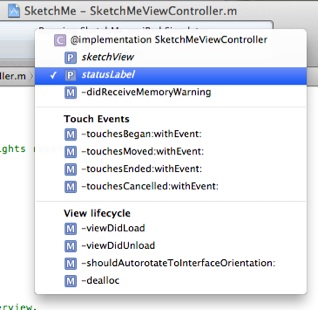
If you take a look at the code we include #pragma marks; these are used by the Xcode environment to help the developer navigate around the source and keep the methods organised (see the example opposite).
Review of what we have done so far...
So far, you have created a custom view that draws a border around its edges. You have also built a view controller that can managed the two UI objects used so far - your custom view (sketchView), and a label (statusLabel). In addition, you have added code to the controller to capture and act on events, such as touch events and motion events. The SketchMeViewController and MySketchView objects correspond to the “Controller” and “View” in the MVC model. However, we have done nothing about creating a “Model”. More importantly, we have the basis for a drawing app, but don’t do any drawing!!!
A common mistake when starting to develop iOS apps is to try to paint the screen directly from the touch event; however, this will not work, as the view will only be updated by the Cocoa environment when necessary. It also violates the MVC design pattern, and tightly (and unnecessarily) binds the controller to the view.
A better way is to develop a model which is updated by the controller, and then make use of this model by the view to paint the screen. The following steps introduce a way of doing this, by providing a simple model that stores a number of lines in an array, where each of the lines is in turn an array of touch points.
Walkthrough - Step 4.
Download the class files for MyDataStore, and add the header and implementation file to your project. You can do this from the Xcode File menu, or simply by dragging the two files in the file list within Xcode. When asked, specify that a copy of the files are added to the project. This class was designed to hold more than just lines, and can be used to expand your project to allow lines to vary in width, colour and transparency. But for now, we will focus on the lines.
In this step, you need to create a MyDataStore object which is owned by the SektchMeViewController, but that can be shared by the view. import the MyDataView header file in the two SketchMeViewController and MySketchView implementation files, and declare the class file using the @class operator in the header files of both the SketchMeViewController and MySketchView classes. The statement:
@class MyDataStore;
in the two header files tells the compiler that the class exists, without needing to import all of the details of the class from the MyDataStore.h header file. You will still need to include this header file in the two implementation files so that the compiler knows the details about the class, but it avoids including header files in other header files, which could then be included in yet more files. Create ivar pointers to a MyDataStore object in both the SketchMeViewController and MySketchView class definitions, and make the ivars properties (retaining the object). An example of what the MySketchView header file is given below. The ivar and property in SketchMeViewController should be similar.
#import <UIKit/UIKit.h>
@class MyDataStore;
@interface MySketchView : UIView {
MyDataStore *myDrawingModel;
}
@property (nonatomic, retain) MyDataStore * myDrawingModel;
- (void)resetRectView;
@end
The next step is to create a MyDataStore object in the view controller, and then share it with the view. Look for the methods viewDidLoad within the controller, and create (using alloc and init) the myDrawingModel object, and store it in the controller’s ivar. Note that we check to see if myDrawingModel is not nil - this is in case for some reason the method viewDidLoad is called again. Testing for object existence in this way is good practice, and worth remembering. Finally, we send a message to sketchView to share this model by setting (and retaining) the property myDrawingModel with the same model object:
Call the view’s accessor method to pass the object to the view as follows:
if (!myDrawingModel)
myDrawingModel = [[MyDataStore alloc] init];
[sketchView setMyDrawingModel:myDrawingModel];
Finally, override the dealloc method in the SketchMeViewController.m implementation file to release the model - by copying the code below. Do the same in MySketchView.m implementation file. This ensures that the model object is released when either the controller class instance or the view is released.
- (void)dealloc
{
[myDrawingModel release];
[super dealloc];
}
Check this works by compiling the code and looking for errors. There should be no errors as yet, but conversely, there will be no new behaviour - than happens next, when we update the model each time a touch event occurs.
Take a look at the source code for the MyDataStore class. In particular, it provides two top level methods:
-
•addStartPoint, which creates a new line structure, and
-
•addMovePoint, which adds point to the current line structure.
The addStartPoint method also takes a number of other parameters for defining the line width, colour values in terms of red, green and blue, and an alpha value that determines the transparency of the line. For now, we assume a grey semi-transparent line and a a default line width of 5.0. We can set these parameters with some other value later, when we extend the app.
Modify the method touchesBegan:withEvent: in SketchMeViewController.m to construct a new line structure, corresponding to the start of a drawn line:
[myDrawingModel addStartPoint:touchPoint
withLineWidth:5.0
withRedValue:0.5
withGreenValue:0.5
withBlueValue:0.5
withAlphaValue:0.5];
Adding touch points as the finger moves is simpler - simply send the addMovePoint message to the model with the touchPoint in the method touchesMoved:withEvent: in SketchMeViewController.m, as follows:
[myDrawingModel addMovePoint:touchPoint];
You should also modify the status message generated with each touchesMoved event to also display the number of points in each line by using the pointsInCurrentPath message. For example, replace the statusMsg definition with the following statement:
NSString *statusMsg = [NSString
stringWithFormat:@"Touch Move at %.0f, %.0f, having added %d points",
touchPoint.x, touchPoint.y, [myDataStore pointsInCurrentPath]];
Compile the code and check that no new errors have been introduced. When the application is run, you should see the point count increment whenever you draw on the screen.
Walkthrough - Step 5.
To render the points in the view, we need to modify the drawRect method. This involves getting and saving the current graphics context, before iterating through all the lines in the model. For each line, you will need to set up the drawing primitives given factors such as colour, linewidth etc, and finally iterate through the points in the path. Copy the definition of drawRect (below) and replace the current version we have in MySketchView.m, and then check that it works. Take a look at the code and try to understand what is happening.
- (void)drawRect:(CGRect)rect {
// Drawing code
int pathCount, pointsCount;
CGPoint myPoint;
int i, j;
float pathLineWidth;
// Get the current graphic context
CGContextRef context = UIGraphicsGetCurrentContext();
// Save the current context status
CGContextSaveGState(context);
if((pathCount = [myDrawingModel pathsInStore]))
for (i=0; i < pathCount; i++) {
// Will need to set up the context regarding each path
if ((pathLineWidth = [myDrawingModel lineWidthForPath:i]) > 1)
CGContextSetLineWidth(context, pathLineWidth);
else
CGContextSetLineWidth(context, 1.0);
CGContextSetLineCap (context, kCGLineCapRound);
CGContextSetLineJoin (context, kCGLineJoinRound);
CGContextSetRGBStrokeColor (context,
[myDrawingModel colourValueForPath:i forColour:RED],
[myDrawingModel colourValueForPath:i forColour:GREEN],
[myDrawingModel colourValueForPath:i forColour:BLUE],
[myDrawingModel colourValueForPath:i forColour:ALPHA]);
CGContextBeginPath(context);
myPoint = [myDrawingModel pointForPath:i atIndex:0];
CGContextMoveToPoint(context, myPoint.x, myPoint.y);
pointsCount = [myDrawingModel pointsInPath:i];
for (j=1; j<pointsCount; j++) {
myPoint = [myDrawingModel pointForPath:i atIndex:j];
CGContextAddLineToPoint(context, myPoint.x, myPoint.y);
}
// Draw the path out
CGContextStrokePath(context);
}
// Restore to previous context status
CGContextRestoreGState(context);
// Redraw the boundary of the subview
[self resetRectView];
}
Whilst this will now determine what will appear on the screen, we still need to ensure that the view knows that it needs to be redrawn. To do this, you should send the message setNeedsDisplay] to the sketchView object whenever the model has changed, so that the view can request that it gets redrawn. When the application comes up updating the display (typically after all the current events pending have been processed), it will then call drawRect: . Modify the two touch methods in your SketchMeViewController that update the data model, so that once a point has been stored, the s message is sent; for example in touchesBegan:withEvent: you would put:
[myDrawingModel addStartPoint:touchPoint
withLineWidth:5.0
withRedValue:0.5
withGreenValue:0.5
withBlueValue:0.5
withAlphaValue:0.5];
[sketchView setNeedsDisplay];
Compile and run. You should now have a working drawing app.
Walkthrough - Step 6.
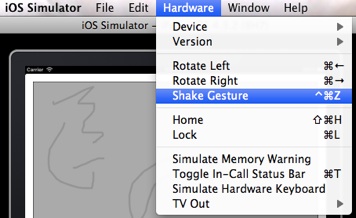
Add the motion events within SketchMeViewController to handle the case when the device is shaken. The code below can be used to detect when the phone is shaken (or a simulated shake occurs from the simulator); however the code needs to be completed to include a message that is sent to the statusLabel outlet to inform the user that a shake event has occurred. The methods viewDidAppear and canBecomeFirstResponder are necessary to ensure that the motion events are sent to the View Controller instance, to be handled.
// ========================================
#pragma mark - Motion Events
// ========================================
- (void) motionBegan:(UIEventSubtype)motion withEvent:(UIEvent *)event {
// An empty implementation to avoid the event
// going up the responder hierarchy
}
- (void) motionEnded:(UIEventSubtype)motion withEvent:(UIEvent *)event {
// Handle the shake
// =============================================
// Initially add some message to appear in the status
// label to announce a shake event.
// Later - delete a line segment.
// This is something that still needs to be done
// =============================================
}
- (void) motionCancelled:(UIEventSubtype)motion withEvent:(UIEvent *)event {
// An empty implementation to avoid the event
// going up the responder hierarchy
}
// ========================================
// Allow the view controller to become the first responder
// so that it can handle motion events.
- (void)viewDidAppear:(BOOL)animated
{
[self becomeFirstResponder];
}
- (BOOL)canBecomeFirstResponder
{
return YES;
}
The MyDataStore class includes two further methods that you can now use to delete paths. The - (void)clearLastPath method deletes the most recent path from the model. However, it only works if the model has a path to be deleted; if you try to delete a non-existent path, then this will create an exception and your application will crash. A second methods, - (signed int) pathsInStore, allows you to keep track of how many paths have been created in the model. Finally, if you remove a path, you will need to instruct your app that the screen needs to be repainted (in a similar way to when a path was added to the model).
Update your code so that when the device is shaken, the most recent path is removed from the model, and the remaining number of paths in the model is displayed in the status label. If there are no paths to be deleted, then simply state in the label that no paths could be generated. Test your code to verify that it works.
Walkthrough - Step 7.
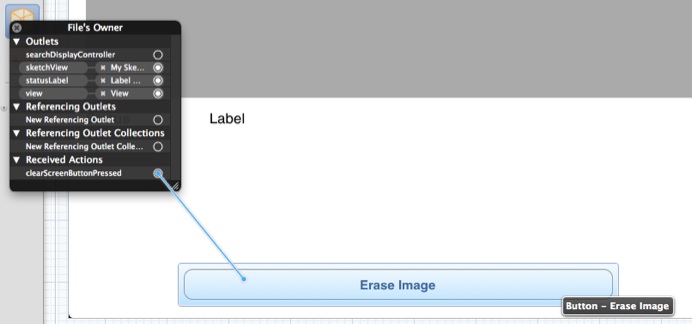
Shaking the device provides a neat way of “undoing” the last drawing action, and in fact many applications on the iPhone or iPad use this interaction to do “undo”. However, in some cases you may want to delete all of the lines, in which case shaking to delete every one can be tedious. In this step, we will create an “Erase Image” button that triggers an IBAction selector, by modifying the nib file. Start by editing the nib file to add somewhere an “Erase Image” button - for example, add the button near the bottom of the screen and make it 500 pixels wide. Make use of the positioning guides to position the button. The following code fragment checks to see if there are any lines to erase, and if so, calls the method clearAll to delete all the paths:
- (IBAction)clearScreenButtonPressed
{
if ([myDrawingModel pathsInStore] > 0) {
[myDrawingModel clearAll];
[sketchView setNeedsDisplay];
} else
[statusLabel setText:[NSString stringWithFormat:@"There is no image to delete!"]];
}
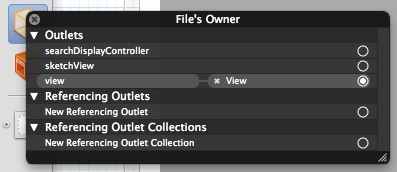
Add this code to the SketchMeViewController implementation file, and include the corresponding method prototype to the header file. It is important that the prototype is added as this informs the Interface Builder Tool that there is an IBAction that should appear in the File’s Owner menu. Open up the view controller’s nib file, and right click the File’s Owner icon to see its menu (see diagram below). Select the empty circle corresponding to the new action, and drag the emerging line to the button you added to the view. When you release the mouse button - a new menu will appear corresponding to the different events. Select “TouchUpInside”, and then test your code to verify that the button works.
Walkthrough - Step 8.
The previous step walked you through the creation of an action, triggered by the button object. In this case we were not interested in querying the object to check its state - the fact that the button was pressed was good enough. In this step, we explore creating an IBAction that allows the code to subsequently query the object.
The data model allows you to modify other pen attributes, such as linewidth, colour (in terms of red, green and blue values), and a transparency (alpha) value. The UISlider object can be configured to represent a range of values and generate an event when the value has changed. Once that event is triggered, the corresponding action can then ask the slider object its value. To test this out, we are going to add a slider which changes the transparency (alpha) of the line. Our current drawing code creates lines with a fixed (constant) value of 0.5. To allow this to change, we need to create a new instance value of type float in our view controller. Add the ivar to the SketchMeViewControler header file:
float alphaValue;
It is up to you if you want to make it a property - it is not strictly necessary if it is to be used within the scope of the class. This ivar needs to be assigned an initial value - the best place to do this in the viewDidLoad method:
alphaValue = 0.5;
Update the code in the touchesBegan:withEvent: method to use the value of this ivar, rather than the constant; i.e.:
[myDrawingModel addStartPoint:touchPoint
withLineWidth:5.0
withRedValue:0.5
withGreenValue:0.5
withBlueValue:0.5
withAlphaValue:alphaValue];
Now we can create the IBAction for the slider object, and create the object within the nib file. The following code fragment updates the alphaValue ivar based on the value of the slider that called it:
- (IBAction)sliderValueChanged:(id)sender
{
UISlider *slider = (UISlider *)sender; // Cast sender into a UISlider
// so "value" calls the UISlider method
alphaValue = [slider value];
}
Before we can test this, we also need to add a slider to the interface. Insert a UISlider and check in the “Attributes Inspector” that the minimum value of the slider is 0.0, and the maximum is 1.0, with the initial value as 0.5. Then attach the UISlider to the IBAction sliderValueChanged, with the event value changed. Test the code by compiling and running the application. If you change the value of the slider, and then draw a line, you should see the transparency of the line change.
Now we can change the value of one line property, we can do the same for the other line properties. One approach would be to create separate IBAction methods for each slider. However, this would result in repetitive code, and can become much more elegant and maintainable. In this case, we are going to reuse the same IBAction with several sliders, and make used of the value of sender to determine which slider was used. However, to do this we need to know which slider is which.
Start by adding the following five iVars to the SketchMeViewController:
UISlider *redSlider;
UISlider *greenSlider;
UISlider *blueSlider;
UISlider *alphaSlider;
UISlider *lineWidthSlider;
Make sure you create a property for each (the alpha property is illustrated below, repeat for the other ivars) and ensure you synthesise them in the implementation file.
@property (nonatomic, retain) IBOutlet UISlider *alphaSlider;
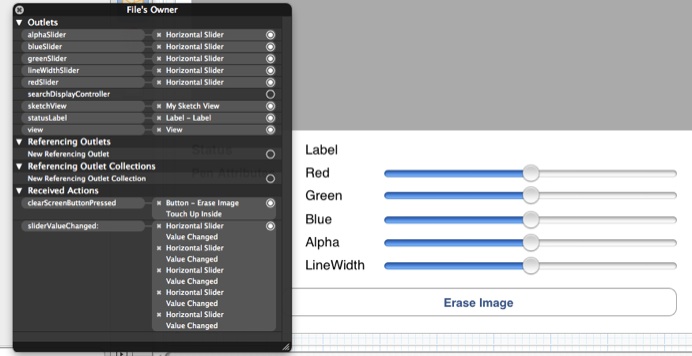
Add UISlider objects for each of these iVars to your nib file and link them to the Outlets. Note that you should already have a slider for the alpha value - previously we hadn’t linked it to a property and it still worked. However, in this case we want references to each of the objects on the interface. Also link each of the objects to the sliderValueChanged: action - the File’s Owner menu should look like this:
In the previous example, we created a float called alphaValue to hold the value of the alpha value when it changed. Create additional float ivars for the other values we are now changing.
Update the sliderValueChanged: method so that it now looks like this (below). Note that we can now check to see which slider has just been updated by seeing if it corresponds to one of those attached to our slider outlets.
- (IBAction)sliderValueChanged:(id)sender
{
UISlider *slider = (UISlider *)sender; // Cast sender into a UISlider so
// "value" calls the UISlider method
if (slider == redSlider)
redValue = [slider value];
if (slider == greenSlider)
greenValue = [slider value];
if (slider == blueSlider)
blueValue = [slider value];
if (slider == alphaSlider)
alphaValue = [slider value];
if (slider == lineWidthSlider)
lineWidthValue = [slider value];
}
We are nearly ready to test. The ranges of the different sliders should all be set to between 0..1, with the initial value as 0.5. However, this is probably not the right range for the line width. In fact, we might want to set the range to be between 1..20, with and initial value of 10. Update the “Attributes Inspector” properties for the line width UISlider and set the minimum value of the slider to 1.0, the maximum to 20.0 and the initial to 10.0.
Before we test, we should modify the the viewDidLoad method to update the initial values of the float ivars. In the previous example, we set the initial value of alphaValue to 0.5. However, we also explicitly set the initial value of the slide to be 0.5 within the code. It would be better to do this only in one place, and use this to decide the value at the other place. We have already seen how we can query the sllder to check its value. We can also send a message to the slider to set its value.
The following illustrates how we can do this within the viewDidLoad method:
[redSlider setValue:(redValue = 0.5) animated:YES];
[greenSlider setValue:(greenValue = 0.5) animated:YES];
[blueSlider setValue:(blueValue = 0.5) animated:YES];
[alphaSlider setValue:(alphaValue = 0.5) animated:YES];
[lineWidthSlider setValue:(lineWidthValue = 10.0) animated:YES];
Each line sets the value of the slider to be that of the corresponding value (which we also assign inline). Note that we set each to be animated. If we reset the initial values for each of the sliders to 0.0 in the nib files, then we will see the sliders chance value automatically when the app starts.
Test the application to make sure it works. If you had set the background colour to the MySketchView view to grey, this might be a good time to reset it to white.
Additional Task 1
Currently it is possible for the user to move their finger outside the bounds of the MySketchView class, resulting in coordinates that exist beyond this interface element. Modify the coordinate reporting code so that if the finger does leave the MySketchView class bounds, then the reported coordinates only report coordinates within the bounded area. For example, if the user’s finger moves up above the origin, then the y coordinate is reported as “0”, although the true coordinate may be a negative number.
Additional Task 2
Modify the app to include a “Reset Pen” button, that reinitialised the pen’s values. Create a method that sets these values (hint - look at the code you added to the viewDidLoad method in the very last step, and create an action to do run the same code. Call it from viewDidLoad as well as being an action, as you don’t want to repeat the same code twice.
Additional Task 3
It is often desirable to see what the pen colour/size would look like before drawing with it. Create a new view called PenView that simply draws a short line using the current pen settings. Add a view instance of this type to the nib, and update it whenever any of the sliders change.