COMP329: 2017-2018
Robotics and Autonomous Systems - Labs
COMP329: 2017-2018
Robotics and Autonomous Systems - Labs
Tuesday, 17 October 2017
COMP329 Lab 3 - Sensors and Configuration
Todays Tasks:
Step 1: Using the Ultrasound Sensor.
So far in our labs we have been making use of the EV3 InfraRed sensor, which has a range of approximately 50 cm, and returns this as a number (the units are in cm). These sensors were modeled using the EV3IRSensor. For our current robots, we have a mix of EV3 and NXT Ultrasound Robots, which use either the EV3UltrasonicSensor or the NXTUltrasonicSensor classes. Both of these classes conform to the LeJOS Sensor Framework. Full details of these classes can be found at the EV3 Lejos API web site.
NXT UltraSound Sensor
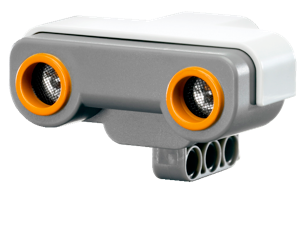
private NXTUltrasonicSensor uSensor;
uSensor = new NXTUltrasonicSensor(myEV3.getPort("S3"));
distSP = uSensor.getDistanceMode();
distSample = new float[distSP.sampleSize()];// Size is 1
EV3 Ultrasound Sensor
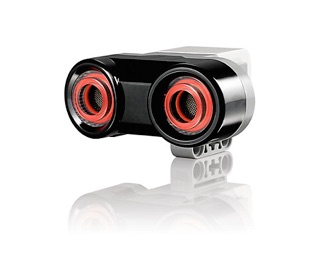
private EV3UltrasonicSensor uSensor;
uSensor = new EV3UltrasonicSensor(myEV3.getPort("S3"));
distSP = uSensor.getDistanceMode();
distSample = new float[distSP.sampleSize()];// Size is 1
Check which sensor you have and modify the PilotRobot and PilotMonitor classes from Lab 2 to make use of this sensor. Examine what the output is when the robot is some distance away.
Step 2: Using bluetooth to communicate with the LeJOS Brick.
Download the two classes EV3Server.java and PCClient.java which accompany the book “Maximum LEGO EV3: Building Robots with Java Brains” by Brian Bagnall (other code fragments are available from the publisher). These can be used to test out how to communicate with the Brick over Bluetooth. The bricks can communicate with the PC using TCP/IP (and therefore using sockets) and unlike in previous years, do not require a specific API to support communication. Furthermore, once a Bluetooth connection has been established with your PC and the Brick, you can also download code, or use the LeJOS EV3 Control Panel provided by Eclipse to manage your brick remotely. Speak to the demonstrator about the process for pairing the Brick using Bluetooth, and then establishing a network connection.
Once this is working, see if you can use bluetooth to get sensor data from your brick (create a similar thread to the PilotMonitor that sends data to a PC client) to display on the PC. This may be useful when debugging or working with your assignment.
Step 3: Tasks and Hints on your Assignment.
The following list of tasks include those that have been suggested to students in the past to help them think about possible solutions to their assignment. Take a look at these, and try solving them if you believe they will provide insight or source fragments that you can then use in your assignment.
1.Develop a program that systematically covers the entire arena. Remember that the more times the robot covers a grid square with its sensors, the more sure it can be whether the square is occupied or not.
2.This program needs to be able to cope with obstacles — that is it needs to completely cover the arena even if there are obstacles in the arena.
3.Use the OdometryPoseProvider to track where the robot thinks it is as it moves around. Use this information to determine how far the robot can go without getting lost.
4.Use the colour sensor and coloured paper to reset the odometry to minimise odometry errors.
5.Try using data from both the ultrasound sensors and the bumpers. In particular, you may find that the bumpers are more helpful in detecting the edges of the arena.
There is not much to this lab - the main aim is to give you possible tasks that you could do to support you with your first Assignment.