COMP329: 2017-2018
Robotics and Autonomous Systems - Labs
COMP329 Lab 1 - Getting Started with LeJOS
Todays Tasks:
Step 1: Hello World on the EV3 brick.
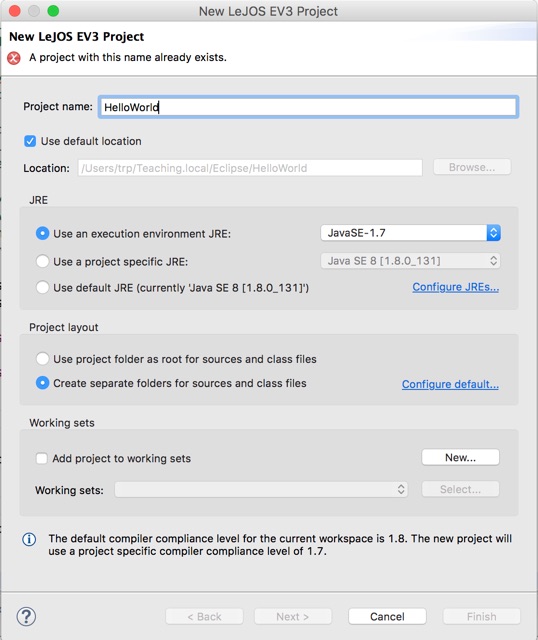
Start Eclipse and create a new Java project, by selecting “File > New > LeJOS Project”. If the option of a LeJOS project doesn’t appear, then select “File > Other” and look for the LeJOS EV3 Project Wizard. Create a new Project and ensure that the execution environment is set to JavaSE-1.7 (see below). Call the project “HelloWorld”:
Add a new class (called HelloWorld) and include the following content:
import lejos.hardware.Button;
public class HelloWorld {
public static void main (String[] args) {
System.out.println("Hello World");
Button.waitForAnyPress();
}
}
Compile this program, and ensure that there are no errors. Use the USB cable to connect the computer to the EV3 brick, and ensure that the brick is switched on. Run as a “LeJOS EV3” program.
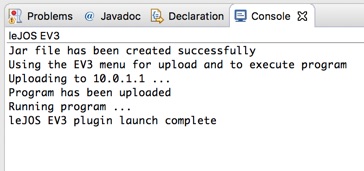

Eclipse will try to download the program to the EV3. The console will show the progress of the download, and it should end with the robot asking you to “Wait a second...” before then running the program. Once run, remember to press any of the keys on the brick to end the program.
Take a look at the version of HelloWorld.java on the course web site (under “Lecture Intro to LeJOS & EV3”), and try changing your code to use the LCD class. Details of this class and its methods can be found at the EV3 Java Docs Web Site.
Step 2: Familiarise yourself with the EV3 brick, and run a downloaded program.
On the brick, use the left and right keys to navigate through the top level menu until you get to “Programs”. Select the ENTER key (the square one in the centre of the arrows), and then select the jar file for your program by navigating with the up and down keys and selecting ENTER. You will then see various options, including “Execute Program”. Select that, as a way of running the program from the brick. You can also use the ESCAPE key (the gray one in the left hand corner above the cursor keys)
Note that you can delete your program, as well as making it the default for the brick. Furthermore, if you do run the program with System.out.println, then that text will also be written into a file “HelloWorld.out”, which you can also inspect on the brick.
Step 3: Understanding how to use the motors and touch sensors.
In the lecture notes we looked briefly at the programs SimpleDriver.java and SimpleSensor.java (also available from the course web site. Take a look at these and either download them, or create new projects and add the code to your class. Test these out and ensure you understand how they work.
Create a new program that does the following:
1.Waits for the Enter button to be pressed.
2.Starts up both drive motors going forward.
3.Stops both motors as soon as either touch sensor is activated.
4.The program should quit at any time if the Escape button is pressed.
Use the SimpleDriver and SimpleSensor source as inspiration.
Step 4: Navigating a square using the motors.
The aim of this step is to attempt to navigate a square using just the motors. Next week we will be exploiting the MovePilot, but for now, you get to do it the hard way! The good news is that you don’t have to be precise with distance!
Write a program that drives the robot in a square. The robot should:
1.Drive for about a foot in a straight line.
2.Turn through 90 degrees.
3.Repeat the above actions 3 times.
The robot should wait for a button to be pressed to start, and the program should exit when the square is complete.
Step 5: Controlling the motors using the sensors.
Write a program that drives the robot around avoiding obstacles. The robot should:
1.Wait for the Enter button to be pressed.
2.Drive forward until one of the touch sensors is activated.
3.Reverse for a few seconds.
4.Turn away from the obstacle. That is, if the right sensor was activated, turn to the left. If the left sensor was activated, turn to the right.
5.Stop if the Escape button is pressed.
You can use the (printer paper) boxes in the Robotics Lab as obstacles.
Let the robot roam around its area for a while, checking that it can always avoid getting stuck. You may need to adjust the amount it backs up and the amount it turns to make this happen.
Step 6: Testing out the Infrared and Colour Sensors.
Modify the obstacle avoidance program to use the Sonar sensor. You will need to use the EV3IRSensor class (take a look at it’s methods in the EV3 Java Docs Web Site. Make sure that you use the correct port. For now, just leave it pointing in a forward direction (i.e don’t move it using the third motor). You will want to use a similar approach to getting sensor samples as that used in the SimpleSensor.java code sample, using the Sensor Framework. Use the proximity information to have the robot turn away from any obstacle before it hits it. Again, the API will tell you what other functions can be called on the sonar.
Try developing a variant, but this time use the colour sensor to stop the robot when it detects a specific colour (there are also coloured sheets in the Lab). For this, use the EV3ColorSensor class to print the value you get from the sensor on the LCD screen and experiment with the values you get at different places in the robot arena.
Modify the obstacle avoidance program to make the robot stop when it is on one of the coloured patches.
There are two ways to use LeJOS, one is through Eclipse, the other is
running the compiler/linker/downloader from the command line.
In this lab, we focus on doing things in Eclipse. If you are interested in installing the LeJOS environment on your own machine in Eclipse, or using another environment and installing programs using the command line, then see the instructions on the Lab Resources page.

