Continue the interactive terminal session by following the instructions given on this web page.
When typing UNIX commands always use lower-case letters. Note also
that the typographical conventions given below are used in the following pages:
Try each of the following commands at the "dollar" prompt.
Note that the result produced by the last command is not an error. When
England switched from the Julian to the Gregorian calendar in September,1752, 11
days were removed from this month. There were riots in the streets with people
chanting "give us back our 11 days"!
3. CHANGING YOUR PASSWORD
As this is the first time you have logged in you will be asked to change
your password immediately to one known
only to you and that you will easily remember. There are restrictions on what
sort of password is acceptable. A
valid password must:
- Contain between 6 and 8 characters
- At least two characters must be letters (upper or lower case)
- At least one must be:
- numeric (the digits 0 through 9), or
- special (neither letter nor numeric - for example, -, _, @ or $).
To change your password type the following
command in one of your windows (make sure you have input focus first):
$ passwd 
Now choose a new password and type it in. You will be asked to verify it by
retyping it. Make sure you remember
your password you will need it next time you wish to log in.
More information can be found on
changing your
password
in the appropriate section of the "Computer Science Introductory Guide".
3. YOUR HOME DIRECTORY
When you login you are automatically placed in your home directory. The name of your home directory depends upon your username. To find out the name of your home directory use the pwd (print working directory) command as follows:
$ pwd
This tells you the full path name of your home directory. To display the names of the files in your directory use the ls (list) command:
$ ls
Remember that, at present, you have no directory structure and no files - you
only
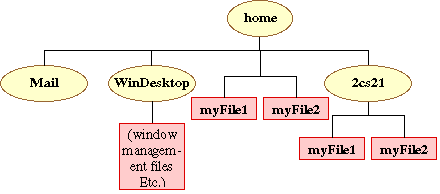
have an empty directory Mail and a directory WinDesktop
conatining various window management files, both have been created by the system
administrator. The Mail directory is associated with the email system,
you will use it to store email messages which you wish to keep (when you get
some). For the time being you can safely ignore the contents of the
WinDesktop directory.
4. CREATING A SIMPLE TEXT FILE
A "quick and dirty" way of creating a text file is to use the cat command
coupled with the greater-than output redirection operator. Try the following:
$ cat > myFile
some text 
You have created a text file, called myFile, in your home directory. Use ls to
check that it is there. Now try:
$ more myFile
or simply:
$ cat myFile
The more command calls a "filter" for examining continuous text, one screenful
at a time. The cat simple "scrolls" through text files.
The distinction is not always apparent
when viewing small files that can easily fit onto a single screen.
There is also a command less which forefills a similar function to
more.
Now make a copy of your "myfile",
called myFile2 as follows:
$ cp myFile myFile2
and name the original "myFile" with "myFile1" using the mv (move) command:
$mv myFile myFile1
Investigate the effect using ls.
5. WORKING WITH DIRECTORIES
It is a good idea to organise your file store in a logical manner. We do this by creating a hierarchy of directories under which related data can be gathered. Type the following to create a working directory called 2cs21:
$ mkdir 2cs21
Use "ls" to determine the effect. To distinguish between directory names and file names try:
$ lsf
The lsf command appends a / character (forward slash) to directory names.
We can copy or move files from our current directory into the new directory using the "cp" and "mv" commands, however, we must indicate the path to the new directory. We can do this using relative path names. For example:
$ cp myFile1 2cs21/.
Note that the dot is used for convenience where we wish to keep the name of the original file.
Copy both your "myFile" files to the new directory using the cp
command with appropriate arguments. To check that the copies have been made, change directory to your
2cs21directory using the cd command:
$ cd 2cs21
and then use ls. You should now have a directory structure which can be conceptualised as shown below:
Change back to your (top level) home directory. You can do this simply by typing:
$ cd
without specifying a path (the default path is the relative path from your current directory to your root directory). Now remove your two "myFiles" from the root directory thus:
$ rm myFile1
$ rm myFile2
or
$ rm myFile1 myFile2
Be very careful when removing files, once removed it is extremely difficult to get them back (if at all)! If desired a directory can be removed using the command rmdir although this will only work if all files and sub-directories contained in the directory have previously been removed.
For further information regarding
files and
directories refer to the
appropriate sections in the "Introductory Guide".
6. TEXT EDITING
Stay in your root directory. Now you are going to copy a text file from another directory under a different user
name into your 2cs21 working directory that you have just created, and edit it using a type of program
called a text editor. The particular text editor program that you are going to use is called "ved"
(visual editor). It is necessary to familiarise yourself
with at least one text editor as it is the means by which you not only change the contents of existing text files,
but also create new text files. To copy the file you use the cp (copy) command introduced above.
You also need to know the full path to the file to be copied. This is:
/users/ra/frans/public_html/2CS21/week2/timetable.txt
However, this is somewhat cumbersome, and thus Unix provides a short hand to specify the first part of the path
using the ~ (tilda) character. Thus we can write:
$ cp ~frans/public_html/2CS21/week2/timetable.txt
2cs21/.
(space between timetable.txt and 2cs21). Use this "cp" command to copy the
timetable.txt file into your 2CS21 directory. Remember
the . (dot) character is used as a shorthand for the destination filename where we wish to keep the
filenames the same. Copy the file and then change directory to your "2cs21" directory using the cd command.
List the contents of the file using the more command. The file contains a skeleton timetable as shown
below:
+-----------+-------+-------+-------+-------+-------+-------+-------+-------+
|           | 09:00 | 10:00 | 11:00 | 12:00 | 13:00 | 14:00 | 15:00 | 16:00 |
+===========+=======+=======+=======+=======+=======+=======+=======+=======+
|           |       |       |       |       |       |       |       |       |
| Monday    |       |       |       |       |       |       |       |       |
|           |       |       |       |       |       |       |       |       |
+-----------+-------+-------+-------+-------+-------+-------+-------+-------+
|           |       |       |       |       |       |       |       |       |
| Tuesday   |       |       |       |       |       |       |       |       |
|           |       |       |       |       |       |       |       |       |
+-----------+-------+-------+-------+-------+-------+-------+-------+-------+
|           |       |       |       |       |       |       |       |       |
| Wednesday |       |       |       |       |       |       |       |       |
|           |       |       |       |       |       |       |       |       |
+-----------+-------+-------+-------+-------+-------+-------+-------+-------+
|           |       |       |       |       |       |       |       |       |
| Thursday  |       |       |       |       |       |       |       |       |
|           |       |       |       |       |       |       |       |       |
+-----------+-------+-------+-------+-------+-------+-------+-------+-------+
|           |       |       |       |       |       |       |       |       |
| Friday    |       |       |       |       |       |       |       |       |
|           |       |       |       |       |       |       |       |       |
+-----------+-------+-------+-------+-------+-------+-------+-------+-------+
You are now going to use the ved text editor program to
change the contents of this file so that it includes your own lecture times.
Invoke the text editor by selecting the Editor button from the
tool bar.
You tutor will now show you how to load the timetable text file
into the ved editor, and give a short demonstration of using the
editor
After the demonstration, go ahead and edit your file. Refer to the Introductory
Guide to the ved Editor, or ask your tutor, for advice about using ved. If necessary complete
the task in your own time. Make sure that you know how to do the following:
- Insert new text into the file
- Overwrite existing text
- Delete characters from the file
- Quit the edit (without saving any changes you have made)
- Save the edit (i.e. store the changes you have made)
These are all described in the introductory guide.
7. PRINTING
On completing the above you can print your newly-edited timetable text file using the command:
$ lpr fileName
Your tutor will show you where to collect your print out. Further information is
available regrading
printer and printing in
the CS "Introductory Guide".
8. LOGGING OUT
At the end of the session:
- Do not remove the timetabel text file or your "myfiles" contained in your 2CS21
directory - you will need them for your next tutorial session.
- Close down any programs that you are running - ved, netscape (your tutor will demonstrate the latter).
- Move the mouse until the cursor is on the grey background area of the screen
(the root window).
- Press the left button of the mouse - a menu will appear.
- Without releasing the button, drag down until the Logout option is highlighted
- Release the mouse button - you have now logged out.
Further information regarding logging out can be found in the
"finishing a session" section
of the introductory guide. Finally note that
you can use the computer system at any time in any lab which is free - check the timetables outside each lab before you enter - labs are sometimes reserved for tutorial classes such as this one.
Created and maintained by
Frans Coenen.
Last updated 11 October 1999